Introduction
Assetto Corsa Competizione can be a difficult Sim to pick up and learn quickly. It is arguably one of the most advanced Sim racing platforms available today. ACC is also the most popular Sim Racing game out there; notably helped by its accessibility on both PC and Console.
Often new players can be turned away by the surprisingly tricky handling characteristics, and/or, the huge number of vehicle and game setup changes. To help improve your ACC experience and reduce your lap times, Driver61 has compiled 5 of its best top tips.
Our list has been collated from a wide depth of Sim racing knowledge. Including information from our dedicated Sim coaches, as well as some help from other wider known sources. This article lists some obvious and more obscure tips that you will have most likely overlooked when it comes to nailing the perfect lap.
1. Using the Racing Line Assist (sort of)
This is not just one for the newcomers to ACC, but also for the experienced drivers with circuits they’re not too familiar with.
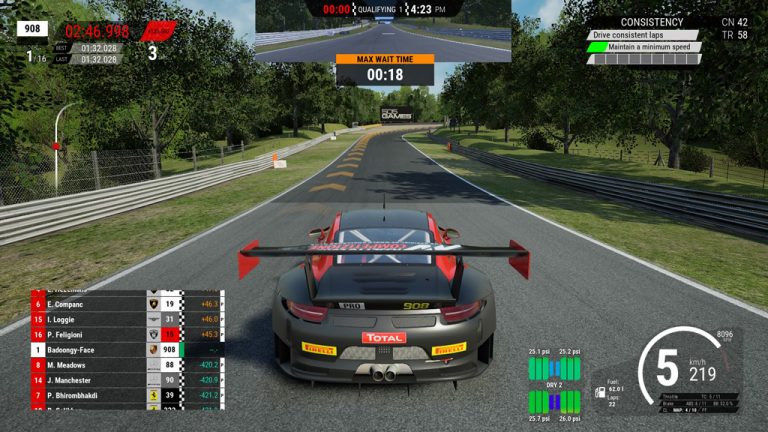
For those who aren’t aware, ACC gives you the option to overlay a virtual ‘Ideal Line’ in the Assists options. This will place a predetermined racing line set by the game.
Generally, the virtual line offers a great starting point for learning the racing line, but almost all ACC players will agree that it takes away from the realism and immersion of a Sim, because, quite simply, it’s not realistic. This being said, the virtual ‘ideal line’ can be an incredibly powerful tool for learning new tracks quickly and efficiently.
Let’s be honest here if there was an option for real-world racing drivers to turn on a virtual racing line, they would. It helps visualise the flow of the circuit, what turn-in points you should be using and where to run wide on corner exits.
There are however some areas where the ideal line is less than ideal. Braking points, and the colour grading that it uses to define these points aren’t always reliable. The sim gives you a “safe” line rather than a “fast” line when approaching a corner, meaning that the braking points are usually far too early to carry good speed on corner entry.
Our advice would be to use the ‘Ideal Line’ function when testing a new track but to use it mainly for understanding racing lines and not braking/accelerating markers. When you are comfortable with a circuit and your pace is improving, we strongly suggest turning the ideal line off so that you can then develop your driving technique.
2. ABS – staying out of the ABS activation zone
Within one of the many car settings available in ACC, users have the option to change the ABS severity. ABS stands for Anti-lock Braking System and it is an electrical control unit that quickly releases and grabs the brakes to stop the wheels locking under heavy braking.
ABS is commonly used in road cars as it provides a much safer and predictable means of stopping in poor road conditions. When the car locks wheels under braking, you lose all directional control of that locking wheel. This caused a large percentage of accidents on the road before its introduction in the early ’80s.
In motorsport, ABS was originally frowned upon because it took away from the driving element of racing because now a computer’s deciding how much brake is being applied instead of your foot. Recently, however, ABS has become more widespread and is commonly found in closed-wheel GT and Saloon style cars.
ACC provides a “more or less” style tuning method for ABS, with 11 being the most ABS and 1 being the least. You also have the option to turn ABS off completely. It is commonly known that lower ABS settings give you greater braking performance, with a higher risk of locking.
The trick with ABS is to drive the car without the need for ABS to be kicking in, however, this does not mean turn ABS off and drive without it. In ACC when ABS kicks in, it takes away some of the braking performance, stretching your braking phase out and causing the car to take longer to stop.
How do you know when ABS is kicking in?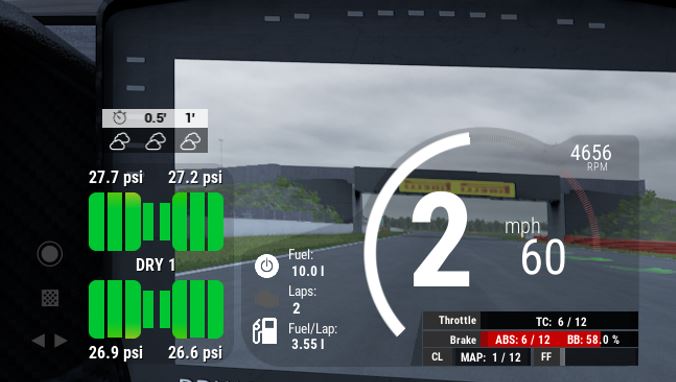
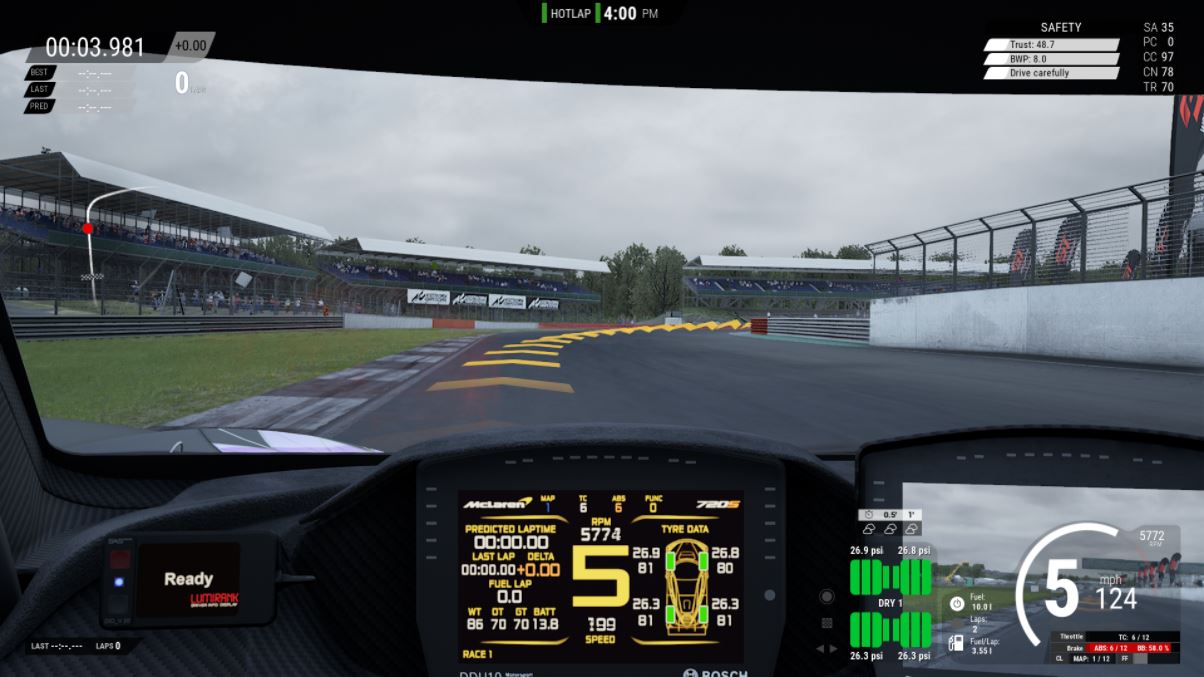
There are two big signals that the car is braking into the ABS; the first is a visual reference by the ABS/Brake Pedal Bar in the HUD. This will flash amber when the ABS is kicking in. The other reference is sound, there is a distinct ticking/clunking noise that can be noticed when the ABS initiates. This can really be noticed in this video here https://www.youtube.com/watch?v=r0iJEq6AEg8
The way to efficiently brake in ACC is therefore to set the ABS so that you can press the brake hard, whilst avoiding dipping into the ABS zone. This can come in two ways, either decreasing/increasing the ABS value, or by careful and accurate force applied to the brake pedal.
We recommend setting the ABS value as low as possible. Try a practice session, with the tyres at optimum pressure range (more below) and pay attention to the pedal graphic. If the ABS is flashing amber then you need to either, adjust the ABS setting down and then work on pedal control to stop the ABS from kicking in further.
3. Braking Off Line
https://assetto-corsa-competizione.net/best-tips-and-tricks/
Trying to find that extra half a tenth in ACC can seem almost impossible at times. The standard of driving within ACC is incredibly high and getting yourself into that upper echelon can take forever.
Aris Drives is an Assetto Corsa employee and game developer, he has a great article talking about some tricks and tips within the SIM franchise to help you find those extra milliseconds. One of the topics he mentions is “Braking off line”, and Driver61 completely agrees.
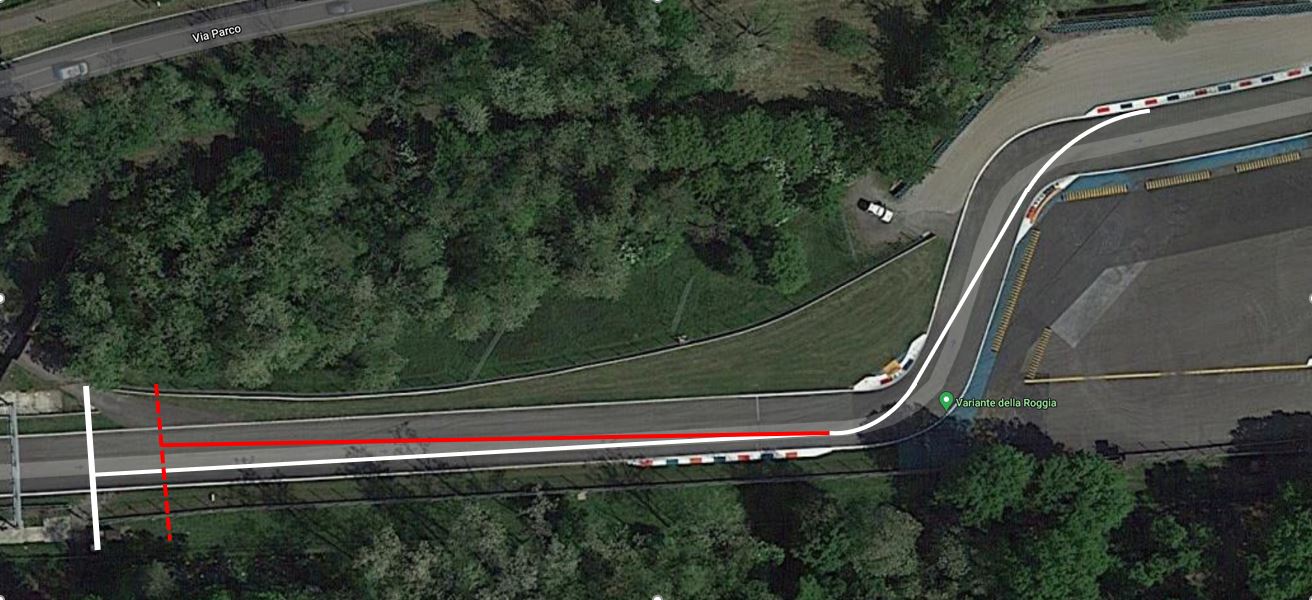
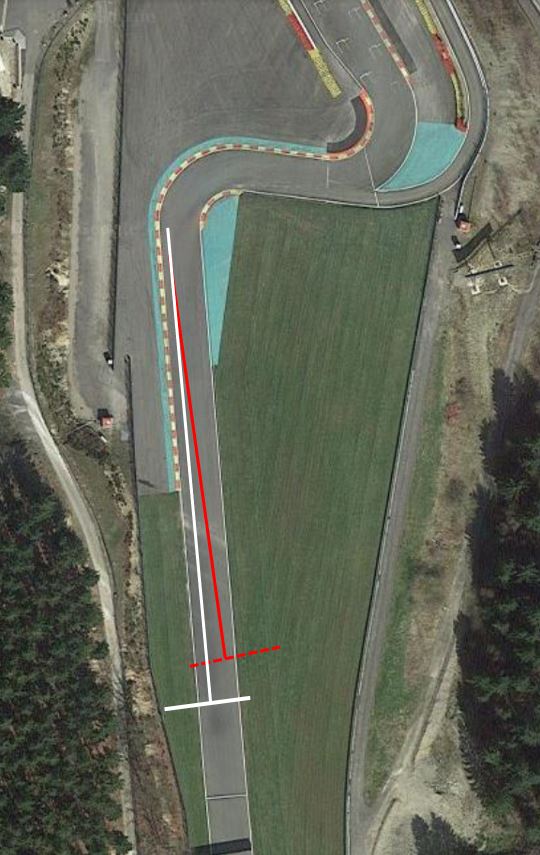
The idea here is that in heavy braking zones, it is sometimes (not always) advantageous to brake diagonally across the circuit, instead of braking straight and on the conventional racing line. The concept is pretty simple, by braking diagonally across the circuit, you are increasing the distance in which the car has to travel. If you increase the braking distance you can therefore brake later.
Take a look at the diagram above for a better explanation. As you can see, the line in white is the conventional braking line, heading straight towards the corner. The red marker shows the alternative braking line that cuts diagonally across the track before joining the standard line again.
The actual length of the two braking zones are the same however because you have moved across the circuit from left to right, you have extended the braking time and can therefore brake later.
This type of braking change may only be worth 0.05 of a second, but this can make all the difference in high-level competition and you can guarantee that E-sports drivers are finding the corners where they can maximise their braking potential.
It should be mentioned however that there are certain types of corner where this applies. For example, if you have to manoeuvre the car massively off line in order to brake at a diagonal, you may be extending the track too much. The ideal corners are ones where the previous corner tends to leave you on the wrong side of the circuit, take the image above as a good example, turn 2 at Monza the “Curve Grande” naturally allows for the car to run to the left so that you can brake at a diagonal without the need to come off line.
Similarly, the last chicane at Spa is another great example (used in Aris Drives video), where the car tends to be on the right-hand side of the circuit. This then allows you to brake diagonally left to take the final bus-stop chicane.
Furthermore, braking in this way will slightly tighten the apex of the bend, so it is best to only use this technique when approaching slow-speed corners, like chicanes or hairpins. For light braking, fast-paced corners, do not use this method, as it can cause the car to become unbalanced and skittish.
4. Throttle/Brake Overlapping
Throttle and Brake control in ACC can be tricky to master. A lot of difficulties in ACC seem to originate from poor brake pedal manipulation. The brakes can be tweaked and adjusted in many ways to improve braking performance within the vehicle settings, however, they don’t always get you feeling more confident when braking.
First things first, ensure that you have your pedals set correctly by checking out our Pedal Setup Guide here.
At Driver61, our coaches put emphasis on a specific braking technique that involves overlapping the throttle and brake pedal simultaneously. This braking method is not commonplace in real-world driving as the mechanics behind it are counterintuitive. The brake pedal is for slowing, the throttle pedal is for speeding up. So why would there be a need to press both pedals at the same time?
The idea is that for high-speed corners where braking forces are not required at their maximum, pressing the brake whilst still on the throttle can settle the weight of the car. In the same situation, if you were to release the throttle and then press the brakes normally, the transfer of weight would be more dramatic, making the car harder to control. 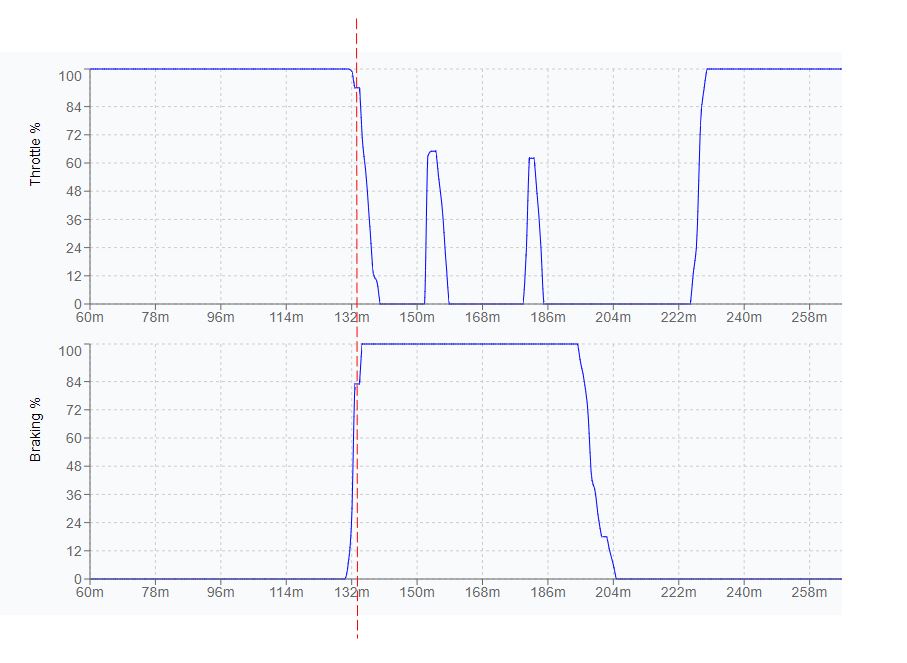
Have a look at this graph showing Throttle % and Brake %. This is for T1 at Silverstone, which is a fast-paced right-hand bend. The data has been taken from one of the top ranked drivers on hotlaps.io and as you can see, the throttle pedal is gradually released after pressing the brake pedal. Causing an overlap. This means that although the car will slow over a greater distance, the weight transfer of the car has allowed for greater stability and therefore can turn in at higher speeds.
The great thing about Sim racing is that there is no budget for vehicle parts, so when you burn through a set of brake pads, you don’t need to buy another set. In real-world driving, there is a lot of mechanical strain that goes through the car when both pedals are pressed. The engine is pushing to turn the wheels whilst the brakes are trying to stop them, so generally, this technique is avoided in races to save vehicle components.
5. Tyre Pressures, Tyre Pressures, Tyre Pressures
Everyone and anyone that has raced in ACC has talked about tyre pressures at some point. They are unquestionably the most important part of vehicle setup to get right. There are three things that determine the outright speed of any car in motorsport:
- The Driver
- The Tyres
- Everything Else
This was a theory taught by the University of Hertfordshire’s Motorsport division and is one that has stuck. It essentially means that if you have a strong driver, and perfect tyres, that you can get around most setup issues with the car. Therefore, it is critical that the tyres are always performing at their optimum range.
In ACC there are 2 ways of monitoring tyre performance, and these are temperature and pressure.
The temperature of the tyre is shown using the colour grading in the tyre HUD. With pale blue/turquoise being cold and dark green/orange being hot.
The tyre pressures can also be seen in the tyre HUD. The tyre pressures are designed to work within an Optimum Pressure Range. The optimum ranges are as follows

Dry Circuit
GT3 – Mid to High 27psi
GT4 – 27psi Exactly
Wet Circuit
GT3 – 29.5psi to 31psi
GT4 – 29.5psi to 31psi
Without describing tyre physics in too much detail, the general consensus is that less tyre pressure gives more grip and higher temperatures, whilst higher tyre pressures will give less grip and lower temperatures.
As the air in the tyre warms up, it expands, causing the tyre pressures to rise. When the tyre is underinflated (low pressure) the rubber is free to move, causing more friction and generating more heat. When overinflated, the tyre is more stable, creating less friction and less heat.
There is a balancing game that needs to be made between having a tyre that is grippy (at low pressure) and having a tyre that will maintain a consistent Optimum Pressure range. Unfortunately, there are a lot of variables that can cause changes in tyre temp and pressure, including; vehicle setup, length of session, track temperature, weather conditions, driving style, etc. because of this, there is no perfect tyre pressure setting that will work for everyone.
Driver61 has a Full ACC Setup Guide here that shows what vehicle settings can affect Tyre Pressures. Use practice sessions of at least 3 laps to learn how the tyre changes over time. Use this information to adjust the pressures to always be within the optimum ranges listed above.

