Grip (or traction) is what keeps us on the track, allowing us to brake, accelerate and turn.
However, finding the limit of grip and continually driving at it, is not easy to perfect.
Welcome to tutorial number four in our Driver’s University series, Understanding Grip. Grip (or traction) is what keeps us on the track, allowing us to brake, accelerate and turn. However, finding the limit of grip and continually driving at it, is not easy to perfect. Our pro-driver, Scott Mansell, takes an in-depth look into understanding grip to help you be faster on track. This tutorial will cover:
- What affects a tyre’s grip
- How does it feel to break grip
- How to approach the edge of grip
- How to make sure your car slides progressively
- Understanding the traction circle – combining lateral and longitudinal forces
What Affects Grip?
Three things affect a tyres grip when you’re driving on the circuit:
- The coefficient of friction between the tyre and the track
- The size of the contact patch
- The vertical load on the tyre (weight of vehicle/aero)
The coefficient of friction between the tyre and the track is determined by the track surface and the compound of the tyre. Different circuits use different varieties of asphalt which give varying grip levels. Other things can influence the grip level too, such as what has been driving at the track in the days before your lapping. For example, if there has been an F1 race the weekend before, it’s likely the circuit will be very grippy, due to the amount of soft rubber that has built up on the surface itself.
On the other hand, if there has been a historic meeting, there will likely be lots of fuel and oil on the track surface, causing it to be horribly slippery. The next point that affects a tyres grip is the size of the contact patch. The contact patch is the amount of the tyre that is actually touching the track surface – which is ordinarily quite small.
If you make this contact patch larger, by fitting wider tyres for example, you will instantly have more grip. The final detail that affects a tyres grip is the vertical load on the tyre. The more weight you put through the tyre, the more it’s being pushed into the track and the more grip you’ll have.
Now, you shouldn’t just go and add as much lead to your car as possible – you’ll also need to decelerate, turn and accelerate that weight, so it certainly wouldn’t be an advantage. However, this is why cars with downforce can corner so quickly – their tyres are being pushed into the ground with a lot of force, without adding weight to the car. This is also the reason weight transfer is relevant. A professional driver can alter the car’s balance – the grip difference between the front and the rear axles – as they corner. They will move the car’s mass around – through the suspension – giving either end more, or less, grip.
How Does it Feel to Break Grip?
Many amateur drivers are worried about the first time they break traction on track – it’s understandable as if you go too far, it’s easy to have an accident. The first thing to understand is that when a car breaks grip, it doesn’t just spin out of control. As long as your inputs are smooth, you’ll get plenty of warning about when the tyres are about to break traction. If you take a look at the diagram below, you will see that the limit of grip isn’t just a line, it’s a band. The car can break traction and slide quite a significant amount and still come back from it.

There are two ways a tyre can break grip: laterally and longitudinally. When a tyre breaks grip sideways, the car slide will understeer or oversteer.
We have an upcoming article that will go into these two terms more deeply. However, understeer is when the front of the car breaks grip and doesn’t turn as much as you want it to, and oversteer is when the rear of the car breaks grip and feel like it is going to spin.
When the tyre breaks grip longitudinally there will be an under or over rotation of the tyre relative to the car’s speed – also known as locking up and wheel spin.
If a driver brakes with too much force, the tyre will not be able to decelerate as much as you would like and so will stop rotating – this is a lock up. You don’t lose all of the grip when the tyre stops turning, but the car won’t slow as quickly as it could. You could also create a flat spot – where the tyre is flat in one area because it’s been locked for a period and wears down very quickly.
If you try to accelerate with too much force, the tyre will over rotate and you will have wheel spin. Again, the grip doesn’t just disappear, but you won’t have as much accelerational force as possible. The wheelspin will also cause your rear tyres to heat up significantly and could take them over their optimum temperature range.
How to Approach the Edge of Grip
One of the biggest difficulties and largest losers of lap time for amateur drivers is finding – and driving at – the edge of grip. It’s a difficult task using the maximum grip of the tyre, even in one section of a corner, let alone using all of the tyres grip in all areas.
I always tell my drivers to build up their speed gently. The reason being is that if you rush this process and increase your speed through a corner in big chunks, the potential to go too far and possibly spin is increased substantially.
Take a look at the diagram below which shows a typical speed v distance trace for a corner where the car slows, turns and then accelerates again. This trace shows the fastest possible route through the corner in question.

Now, we’re going to presume that the racing line, braking technique, steering and throttle inputs are all smooth and with good technique.
On lap one, the driver is a long way below the car’s potential cornering – it’s the first lap and they’re finding their way. On the second lap, the driver has a substantial increase in minimum corner speed but is still quite a way from the optimal pace.
You can see the same for the follow laps, but what’s important is that the closer you feel you are to the limit of grip, the smaller the increase in cornering speed is.
The reason being that when you finally reach the edge of grip and begin to break traction, you’re only exceeding the limit by one or two percent – not 10 percent. If you overshoot by 10 percent, it may be that you can’t make it around the corner and end up having an accident.
How to Ensure Grip Breaks Progressively
Aside from ensuring you increase speed through the corner gradually, there’re a few things that you can do to help the slide – when it finally comes – to be progressive.
As you’ll have read numerous times in our articles, to be fast, you must be smooth. Having fluid inputs – into the brakes, steering and throttle – will also help you drive at the edge of grip consistently and safely while on track.
On the other hand, having rough inputs will mean that the car brakes grip suddenly and can take a driver by surprise. This isn’t what we want. When a car breaks traction quickly, the driver is reacting to the slide, rather than expecting it.
It sounds a little strange but think about trying to push someone over. If you push them hard and quickly, it’s likely that they will fall. However, gently load up your forceful push and they’ll probably stay standing. Your driving inputs should be thought of in the same way.
Combining Lateral and Longitudinal Grip
A fast driver can use 100% of the grip available when he’s braking, turning and accelerating. It’s simple in theory but less simple in practice, as blending the longitudinal and lateral grip requires a very subtle touch.
Take a look at the traction circle diagram below. The traction circle diagram represents the tyre’s maximum grip available in any direction: braking, turning and acceleration or a combination.
One important thing to understand is that if a tyres grip is used at 100% of it’s potential in one direction – e.g., braking – not even 1% of it can be used to turn. The diagram below explains that you must give up some braking grip in order to turn.
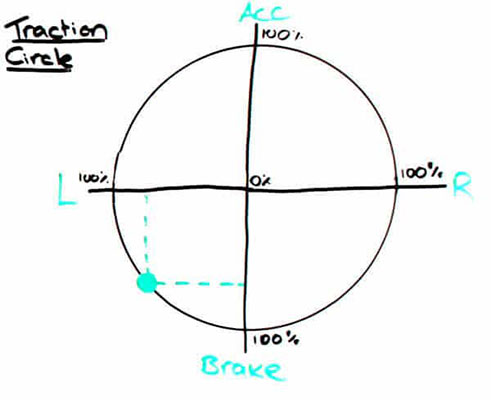
Firstly, let’s say the car is arriving at the corner at terminal velocity. As shown below, the centre of the circle shows the car moving at a constant speed and in a straight line, with the tyres not using any grip for braking, turning or acceleration.
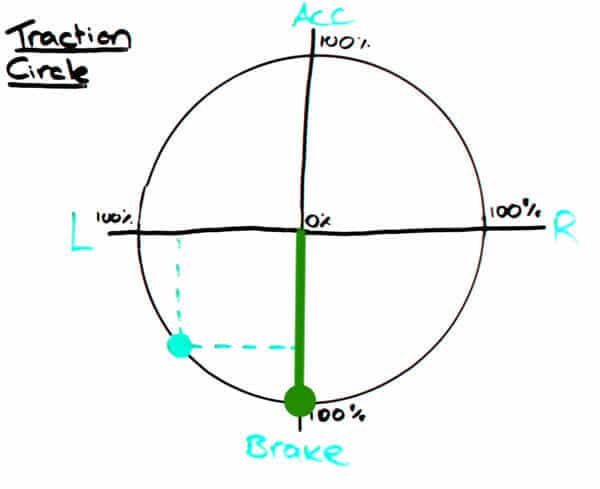
In the next diagram, you can see the driver beings to brake and the tyres are using 100% of their grip (longitudinally) to decelerate the car – and no grip (laterally) to turn as the car is travelling in a straight line.
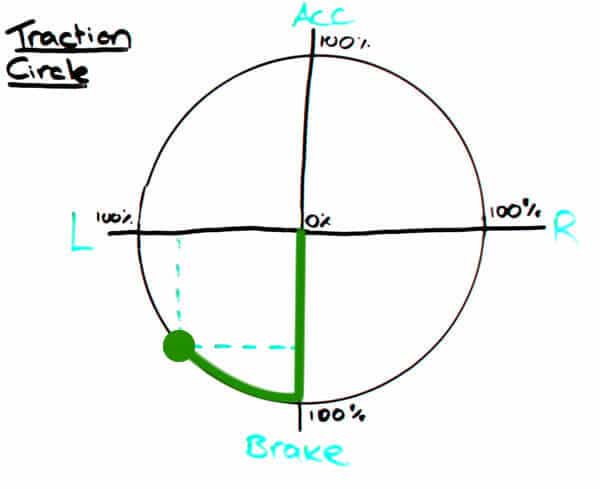
Now the diagram shows the car beginning to turn into the corner. As you can see, because some grip is now being used to turn (laterally), we cannot decelerate (longitudinally) as much as before.
In the next image, you can see we’re approaching the apex. The car is again at a constant speed, with the tyre’s grip solely being used for turning (laterally). This is the phase of the corner where a driver is transitioning their feet from the brake to the accelerator pedal.

Now the car’s at (or just beyond) the apex and we’re going to begin to open up the steering angle and start to accelerate. Note that we have to open up the steering so that we can transfer some of the grip from turning the car (laterally) to accelerating the car (longitudinally).

Comparing a Pro’s and an Beginner’s Grip Circle
As I mentioned earlier, driving at 100% of the tyre’s potential all the way through the corner is difficult, requires lots of feel and more to the point, experience.
On the traction circle diagram below we can see a comparison of a professional (green) and amateur (red) drivers use of grip.
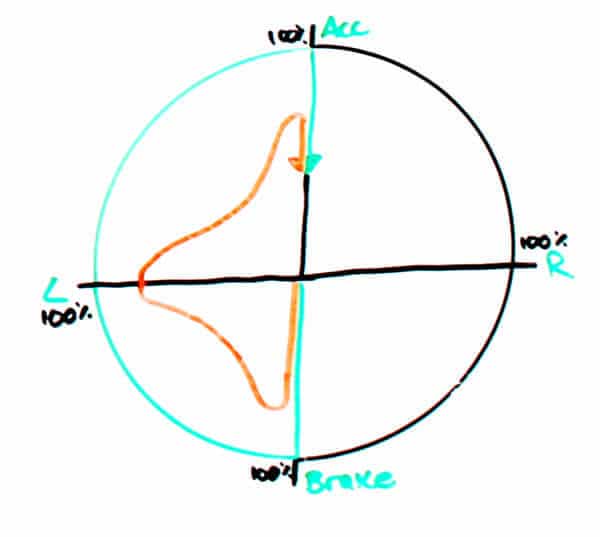
As you saw before, the pro is using 100% of the available grip through all phases of the corner. The amateur driver, however, will likely be a little careful on the brakes and not reach the tyre’s potential during this period.
The amateur driver will then release the brakes (not trail braking), enter and drive through the corner slightly under the grip threshold before they accelerate out.
There’s nothing wrong with this approach – it’s exactly how a beginner should drive. However, the aim is to bring these two traces closer together with each day on track.
How you do this goes beyond the scope of this single article, as it’s a complex blend of many techniques. However, it’s something that we’ll study in coming tutorials, where we’ll look closely into advanced braking, weight transfer, driving at the limit and much more.