In the world of sim racing, drivers will constantly search for the next big upgrade, whether investing in big monitors, direct drive steering wheels or more solid sim rigs. Often, the pedals are a last resort or something that gets overlooked entirely.

In sim racing, there are two forms of sensory input you can use to control the car; hands and feet. Therefore it is performance-critical to have pedals that are set correctly and avoid many common issues like ‘ghosting’ and ‘feathering’ (more below).
In this article, we aim to cover some of the main differences and key terminology when it comes to pedals, as well as our recommended setup process for Assetto Corsa Competizione, which you can skip to here.
Potentiometer vs Load Cell vs Hydraullic
Before adjusting any of your pedal settings, it is important to first understand what type of pedals you are using. If you are unsure, a quick google of the manufacturer and model of your pedal should give you the answer.
Potentiometers are usually found in entry-level setups, whilst the higher-spec wheels will usually support Load Cell style pedals. Hydraulic pedals are not very common, however, they are out there; this is the top end of pedal setup and supposedly provides the highest level of feel.
Potentiometers are generally found on entry-level sim setups. They are generally easier and quicker to manufacture which makes them less expensive. A potentiometer is a device that measures distance and turns this distance into an electrical signal. The electrical signal is picked up by the game and the relative braking force is applied to the in-game vehicle.

The system itself works very well and provides a great starting point for beginner drivers, however, the amount of ‘feel’ and progression through the pedal is reduced and therefore is not recommended if you are thinking about becoming a serious driver. Some of the Thrustmaster range, as well as the Logitech G29, G25, G920 and G925, use potentiometers in their pedal bases.
Load Cell pedals perform differently from Potentiometer pedals. A Load Cell measures the direct force applied to the pedal and turns this into an electrical signal which is then picked up by the game. A load cell pedal still moves the same way when pressed, however, there is a more realistic resistance pressing back. Load Cell pedals tend to be more accurate as they produce signals at a higher frequency than that of a potentiometer. This means that the inputs to the pedal are more sensitive and more accurate, improving immersion and performance. Another key benefit to load cell pedals is that the amount of customisation is higher; depth of travel, pressure, resistance, etc can all be modified and adjusted.
Hydraulic pedals work very similarly to Load Cell pedals however they use a hydraulic reservoir containing fluid to mimic that of a real-world pedal. Again, the main benefits of using Hydraulic is the level of customisation and realistic feel.
Seating Position and Pedal Position
Before making any adjustments to your pedal settings, it is important to make sure that your seating position and pedal location is correct. There is a lot to be gained through correct body posture, as a more comfortable seating position means that you are less likely to fatigue over time. It is widely known when muscles begin to tire, they also decrease in performance and accuracy. There is a great article written here for a full guide on seating position.
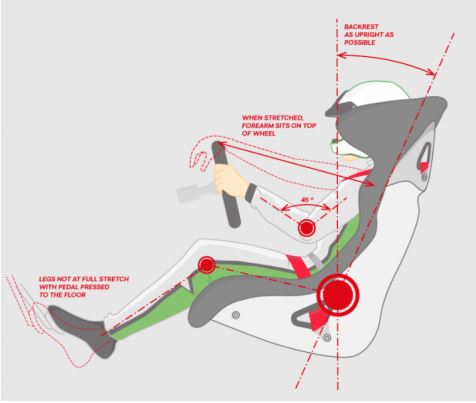
When pressing the brake, a large amount of force is given by your leg to the pedal. This force needs to be repeatable for your body to recognise exactly how hard to press. There are two important points to consider when setting your seating position and pedal position.
Firstly, the distance between your seat and pedals. Your body should be sat at a distance so that when the clutch pedal is fully pressed, there is still a slight bend at the knee. The length of the pedal press should come from the bend at the leg and not the rotation of your ankle. The ankle is not as strong as the knee and thigh muscles, and should therefore only be used for very fine, small adjustments to the pedal.
The second point is ‘mounting’. Both your seat and pedal box should be (if possible) firmly mounted either to your rig, or firmly mounted to the floor. The entry-level pedal boxes that use carpet style grippers are usually not enough and tend to lift up when braking hard. Make sure you have something supporting the pedals from behind to stop them from slipping.
The angle that you mount the pedals should also be a consideration, neither at the top or bottom of the pedal stroke should your ankle be stretched or strained. Adjust the pedal angle to compensate for this.
Furthermore, using a solid chair that does not swivel or roll is critical to getting a better pedal feel.
What are Deadzones? What is Ghosting and Feathering?
A ‘Deadzone’ is a term used to describe an unregistered percentage of pedal application. A deadzone can either be at the beginning of the pedal press or the end of the pedal press.
Ghosting and/or Feathering is when the pedal input flickers at either 0% input or 100% input. This can have an on/off effect on performance, especially when trying to press the pedals to their maximum. It will essentially cause the game to release the pedal when at 100% to 99% and then flicker between the two. Deadzones can therefore be useful when setting up your pedals if you ever find yourself in this scenario. Ghosting and Feathering can be more noticeable on well-used pedals where the sensors can start to show signs of wear.

Deadzones can also be used to eliminate any pedal ‘riding’. This is where your foot rests on the pedal and creates a small amount of constant input, even if you don’t realise you’re doing it. A deadzone can be used to negate this input.
As mentioned, Deadzones are also helpful for top-end pedal input. For example, if you are using a load cell pedal with high resistance and struggle to reach either maximum brake or throttle press, you can apply a top-end deadzone to help reach the full range.
You can adjust your deadzone settings in two ways (which will be covered below), either through your pedals specific firmware or through ACC.
The Difference Between Firmware and Software
Firmware is the manufacturer’s dedicated permanent software that is adjustable via the manufacturer’s advised application (see below). Software (in this case) is relating to the Sim or Game settings that you use the pedals for. For example, ACC has its own dedicated pedals settings within the game. Software and Firmware settings are not linked. Changing one will not affect the other.

Below are the web pages of common pedal manufacturers and their advice for Firmware settings. It is important to note that each brand of pedals are slightly different and may have different setting procedures. It should also be mentioned that the Logitech range (G29, G920, etc) will not carry its Firmware settings over to Console versions of ACC. The changes in Firmware for Logitech will only be applicable for PC gaming.
Logitech – Downloads – G29 Driving Force Racing Wheel – Logitech Support + Download
Fanatec – Driver-Firmware-Instructions-Manual-EN_Web_02_MO.pdf (fanatec.com)![]()
![]()
![]()
Thrustmaster – Thrustmaster – Technical support website
Heusinkveld – Download SmartControl • Heusinkveld
As mentioned above, it is necessary to go through the manufacturer’s guidance when calibrating your pedals. Firmware changes will result in a blanket settings base, meaning that whatever settings you apply, will be carried throughout all Sim racing games.
Assetto Corsa Competizione Pedal Settings
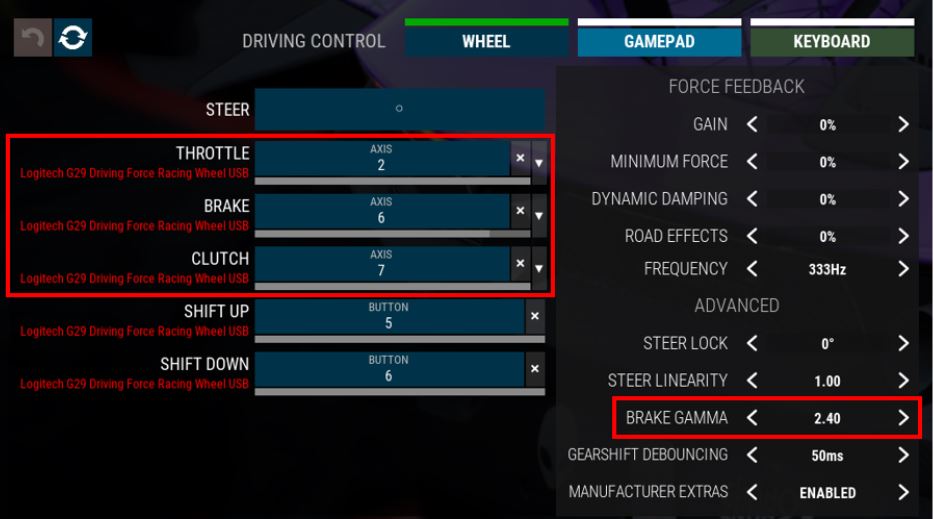
The pedal settings within ACC are thankfully not too complicated. Below is a list of all the ACC settings and their meaning.
There are tuneable settings in ACC for each, Throttle, Brake and Clutch via the small down-arrow button.
Brake Gamma – this is the ‘linearity’ of the force applied by the brake pedal. When set to 1.00, 1mm of brake travel gives you the same force output through the entire pedal range. When set above 1.00 the braking force increases exponentially within the pedal range. Harder pedal presses will generate a higher force. Use 1.00 for Load Cell and Hydraulic pedals. For Potentiometer pedal sets use 2.50 to 3.50 and adjust for preference.
Within each setting for Throttle, Brake and Clutch, you have 3 more options:
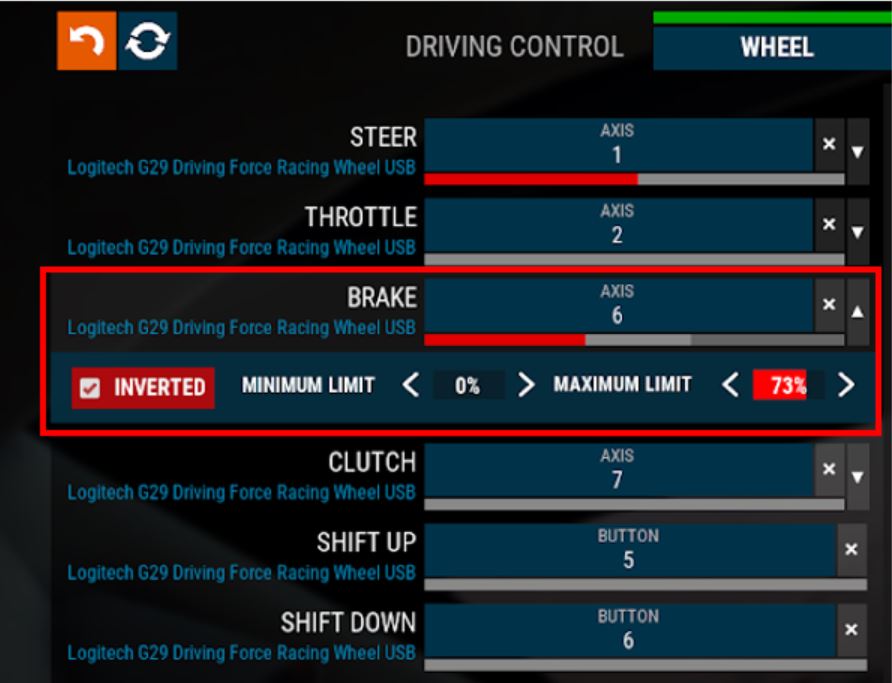
Inverted – this setting refers to the direction in which the pedals are pressed. When checked it can swap 0% input of pedal to be 100% input and vice versa. In some older pedal sets, it will default to this being the wrong way round so make sure to check this before starting.
Minimum Limit – This is the Minimum Deadzone. You can apply this if you find yourself riding the pedals by accident. Anywhere from 0% to 5% should be ok here.
Maximum Limit – This is the Maximum Deadzone. If you struggle to reach maximum pedal reach, then you can adjust this down. For Throttle Maximum we recommend 0% to 5%. For Load Cell and Hydraulic Brake pedals anywhere between 0% and 5%. For Potentiometer brake pedals, 10% to 20%.
For each pedal, there is a moving power bar with colours differentiating the limits of the pedal movement.

The Power Bar Colour Meanings:
- RED – This is the pedal stroke and is a live reading of the pedal movement (press the pedal and this should move)
- LIGHT GREY – This is the actual adjusted range of the pedal
- DARK GREY – This is the deadzone range
- DARK RED – This is the amount of pedal stroke that goes into the deadzone.
The Clutch settings are not usually adjusted but can be changed to suit your preferences.
Driver61’s Recommended Setup Process
- Calibrate and Set your Pedals using your Manufacturers Firmware Application
Using the links posted above, go through your manufacturers recommended setup and calibration for your specific pedal set. Remember that Firmware settings will apply to all games and will not affect the in-game settings. Make sure to set your Firmware changes before opening ACC.
2. Turn on ACC and adjust your in-game Settings
Go to the ‘Controls’ tab in ACC, then ‘Wheel’ settings in the top bar, then adjust Throttle, Brake and Clutch using the settings guide above.
3. Test
Practice makes perfect. Choose a track and car you are comfortable with and set some laps, at pace, with tyres at the correct operating temperatures. Adjust your Max Limit first, and then Min Limit and finally Brake Gamma.
4. Learn and Finesse
Like with all aspect of Motorsport, tuning is an ongoing skill required for all high-level drivers. Learn exactly how these setup changes alter the handling of the car and how they affect your driving technique. Top-level E-Sports players will be making changes to their pedal settings for all variables, such as wet driving, track changes, vehicle changes etc. Understanding when to make the right adjustments will put you at a serious advantage over your competitors.