Hi, I’m Scott Mansell and welcome to the Driver 61 circuit guide for Donington Park national circuit. In this guide, we’re going to take a look at and examine real race footage reviewing braking points, racing lines, and some local knowledge.
Donington Park is a fast and flowing circuit with the national configuration consisting of ten turns over 1.9 miles. It’s a favourite among many drivers and in my opinion one of the best circuits in the UK. I have to admit I have a soft spot for this track as it’s my home circuit and I also held the outline lap record here before the layout changes in 2010.
We’re going to use some onboard footage from a race I competed in earlier in the year in a Radical sports car. This offers a great view of the circuit and with the data logging system we run you can also view throttle and brake position in the car, allowing a real insight inside the driving technique. So without further ado let’s begin by taking a look at a complete lap before we dive into more details and break down each corner individually.
DONINGTON DRIVER COACHING & INSTRUCTION
Our circuit guides are a useful resource before you head to your track or test day, but your progression on track will always be faster with the help of a driver coach.
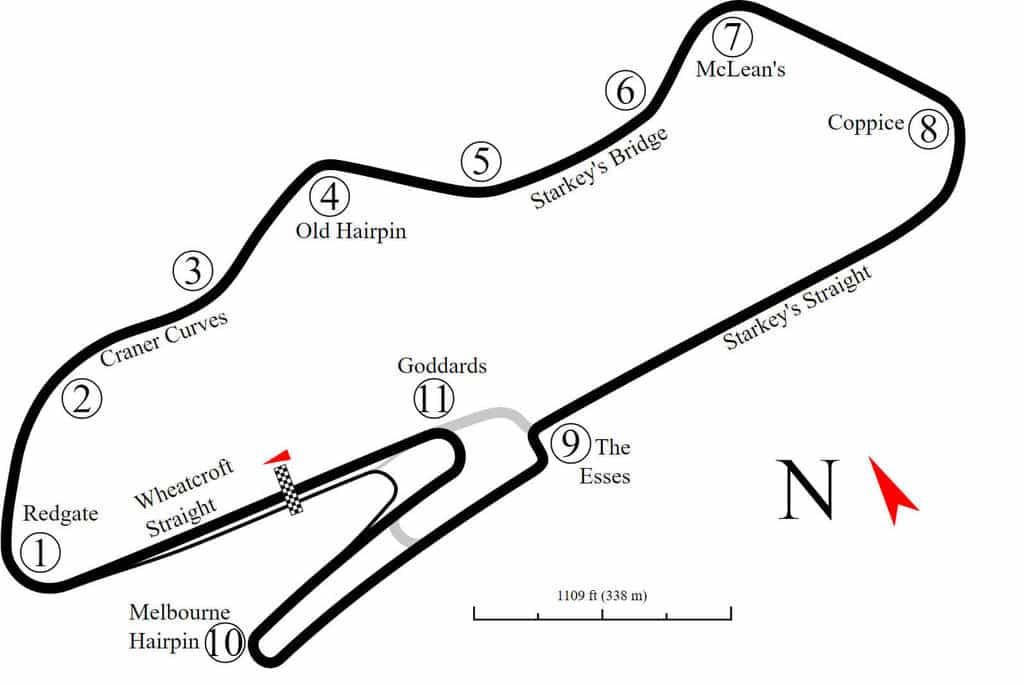
TRACK MAP
If you’d like to follow our circuit guide with a track map, use the following diagram of Donington.
CIRCUIT ADDRESS
Trying to get to Donington Park? Here’s the address:
Donington Park, Castle Donington, Derby DE74 2RP
Start / Finish GPS
Start / Finish Line: 52 49’47.3″N 1 22’46.4″W
Donington Park Lap Overview
And so here we are at the start-finish line at the Donington Park onboard with me in the Radical.
Heading down to the first corner, Redgate, which requires heavy braking as it’s the slowest corners on the circuit. After a late apex, it’s back on the gas down the hill through Hollywood towards the very exciting Craner Curves. It’s left handed, difficult and quick.
Next up is the Old Hairpin, medium braking here, sending the car into the apex and accelerating back up a slight hill towards Schwantz Curve and McLean’s. Schwantz Curve is flat in many cars before requiring heavy braking into the McLean’s. Again, a late apex before we head back up a hill towards one of the most important corners on the circuit, Coppice.
Here we bring the car into the apex and get on the accelerator as soon as possible so we carry as much speed as possible onto the following straight.
Finally, it’s Goddard’s – a medium speed right-left chicane with heavy braking on the entry. Flick the car into the right apex and then into the left. Get back on the gas as soon as we can to carry as much speed onto the start-finish straight. That’s one flying lap of Donington Park.
Redgate
So here we are on the approach to Redgate. It’s the slowest corner at Donington Park and actually has an angle of more than 90-degrees. The approach from the start-finish straight is easy and flat. The corner is actually quite important as it has a relatively long, flat out section after it.
Redgate requires heavy braking and downshifts. As you can see we’re coming down the start-finish straight here heading towards the plus 90-degree corner.
I always asked my drivers to look for braking references in heavy braking zones and obviously it depends on what car you’re in, what speed you’re approaching the corner at and how quickly your car will decelerate, but it’s important that you take a braking reference and you’re conscious of that on each lap you drive at Donington Park.
On the left-hand side here you can see there are some great braking references. For example, you have the end of the pit wall and then there is a barrier that runs a little bit further down.
Now I’m not saying that you have to brake exactly at this point – you could brake twenty meters before or even twenty meters after. It’s just a reference. If you’re in a quicker or lighter car that can decelerate even more quickly, you can move down and begin to use the markings for the pit lane exit on the left-hand side as a reference.
So, in the Radical for example, we’re braking just after the point of the triangle here. The entry of to Redgate requires a late turn-in so we maximize the speed that we can take out of the corner. This comes from a good vision and even at this point on the circuit we should already be looking well ahead of ourselves, looking for the apex.
The further that you look ahead of yourself, the easier it will be to bring the car into the apex and get the perfect racing line. At this point, our vision should already be across at the inside of the circuit. You’re not necessarily steering towards this point right now. But we’re already looking across so that we can manage speeds and steering position and bring the car into the apex properly.
As we move through the braking zone you can see that we should be keeping the car over to the left-hand side as much as possible. So we’re opening up the corner as wide as we can so that we carry as much momentum and speed through there as possible. We’re keeping the car over to the left. You’ll notice that my steering gradually increases – I’m not just turning the car in violently. I’m gradually loading up the car – almost running around the outside for first part of the corner before we gradually increase the steering angle.
An exit road for emergency vehicles to get onto the circuit easily marks the apex point at Redgate. You can see the exit road on the right-hand side where the furthest part of the tarmac meets the curb of the racetrack.
You can actually see that all the grass has rubbed away where saloon cars have been running on to it. As we’re coming on to the apex here, your vision should be well ahead of yourself looking further around the corner, giving yourself as much time as possible to gauge the speed and project the racing line.
The curb on the inside at Redgate is very flat. All cars can run over it and you want to do that so you maximize the width of the corner and carry good speed through it.
A good exit out of Redgate is critical for lap time. The next corner is Hollywood and it’s very important that we carry as much speed out of it as possible. The idea is to get the car straight as early as possible and get on the gas so we carry the momentum through the next corner.
Hollywood and the Craner Curves
Hollywood is really just an acceleration zone for the Craner Curves, so we’re not really going to take too much time to look at it and instead we’re going to focus more on the entry to the Craner Curves.
As we’re coming out of Redgate, we’re heading into Hollywood – it’s all about positioning the car for your end point, two or three hundred meters ahead of this position, so you can get the best lines through the Craner’s.
The car’s position is should be around the middle of the road here as you can see. Taking quite a wide line, with our vision looking a long way ahead of ourselves, the idea is to keep a wide line at the top of Hollywood so that we’re all the way over to the right-hand side of the circuit and best set up for the Craner’s when you turn into the left.
A real giveaway for finding that apex at the top of the Craner’s is where the white line on the right-hand side of the track goes straight. Your car wants to be parallel with this white line. Again, at this point your vision should be looking further down the track than where we are.
The entry of the Craner Curves is very, very quick. In some cars with aero, it’s flat out. In many saloon and GT cars, it’s either very slight brake or just a lift and so everything you do on the entry to the Craner’s needs to be very, very smooth. High speeds means you can’t just lift sharply or stamp on the brakes, it will destabilize the car too much.
The apex point at the Craner’s may be a little bit later than you might expect because we don’t want to run too wide on the exit as it will affect the next corner – the Old Hairpin.
We bring the car across to the left-hand side here and it is possible to use the curb a little bit.
The Old Hairpin
The corner following the Craner Curves is the Old Hairpin, which is a quick right-hander. If you go too far over to the right-hand side on approach it will restrict the speed that you can take through the Old Hairpin. So we let the car move out to about the middle of the road as you can see in the video.
In terms of visions, again you should be looking a long way ahead of yourself. Somewhere down here towards the braking zone and the turn-in point.
The Old Hairpin is one of my favorite corners of Donington Park. It’s quite important because you need to carry out a lot of speed through the apex into the exit towards Schwantz Curve and McLean’s.
It’s important that when you’re braking the steering wheel is straight as you can see here. You need to brake in a straight line, as any steering angle here will unsettle the car. We’re turning the car in quite early just before the end of the curb on the left.
Now, it’s important that you don’t focus on the curb on the left because you should be already looking at the apex. So even as we’re back here your vision should be looking for the apex at the Old Hairpin. We’re letting the car push across to the left-hand side of the circuit with our vision down at the apex, gently turning the steering wheel towards the inside of a corner.
Just to know, for those of you who are racing, it’s illegal to run beyond the blue and white part of the curb. Now from this camera angle it looks like I have just run on to the green curb slightly. But it’s not really that much of a problem in this situation.
At this point we should be looking a long way ahead of ourselves again, towards the exit of the Old Hairpin – in this region looking for the exit curb so we can gauge when we get on to the accelerator towards the exit of the corner.
Due to the track design the curb comes back in quite sharply, in fact, we don’t make this first part of the curb. If you’re running on this early part of the exit curb, you’ll run on to the grass afterward. We’re actually running over the curb quite a long way along it begins. Again, you can see the maximum amount of road that we can legally use is up to the left-hand side of the curb. Beyond this, there is a thin strip of concrete and there’s grass crating beyond this. If you make a slight mistake you can run over this area; it isn’t too dangerous as long as you’re very smooth with the car.
Once we have negotiated the Old Hairpin we move the car back over to the right-hand side. We don’t need to go all the way across as the next left isn’t really that much of a corner t’s flat out in most cars. We’re bringing the car over to the left-hand side here and we’re just trying to make the car as free as possible.
You can use the curb on you left-hand side as well – again it’s very flat and fine to use, but it’s not necessary for the Radical. Then we’re just opening up the steering wheel and letting the car push out wide towards the exit curb. Again, we should be looking away along ahead of ourselves so that we can gauge our speed and our line into the next corner.
Schwantz Curve and McLean’s
Next up we have Schwantz Curve and McLean’s. Schwantz Curve is only really used as a braking area for McLean’s. We try to straight line Schwantz as much as possible before we get on the brakes. It’s important – as you enter Schwantz – that you keep the car as far to the right as far as possible and resist the urge to turn too early.
A common mistake here at Schwantz is to turn too early which causes the car to push too far to the right-hand side on the exit, making McLean’s very difficult. We’re keeping the car near the curb on the right-hand side and release maybe ten to fifteen meters before the end.
Steer the car very gently into Schwantz and we can use the entire curb on the left-hand side here. It’s flat like many of the curbs are at Donington Park – it’s possible to run right over it.
I’m going to get the car in a straight line as soon as possible for the heavy braking of McLean’s. We don’t follow the left-hand side white line of circuit here. We actually drive towards the center of the track. If you move the car too far to the left, it means you actually have to steer while you’re braking and so it’s very difficult to bring the car into the apex of McLean’s.
It’s very difficult at McLean’s to have a reference for a turn-in point. So you really need experience and some seat time in the car around Donington Park before this becomes natural. Once we’ve turned into McLean’s it’s important not to get drawn in too early by the curb. It looks like you should be actually making the apex right about here. However, after this point the curb kicks out again and this is actually the proper apex.
As you can see, as we move the car into the corner we miss that first part of the curb and make the second part. The apex is around this point, so I’ve actually missed it slightly on this lap and my car should be another forty or fifty centimeters over to the right-hand side.
Again, here at McLean’s you can use as much curb on the inside as you like, as it’s flat. At this point, we should be already be looking towards the exit curb all the way out here. So make sure you keep your vision up and look at 200 meters or so ahead of yourself.
The exit of McLean’s has a slight bump in the surface of the circuit. So as you’re coming over it and increasing the acceleration just be careful that the rear doesn’t come around, as the physics of the car and circuit will naturally cause this.
We can use the entire blue and white curb on the left-hand side. Again, it’s very smooth and very easy to run over. As you can see here there is a large strip of green concrete on the outside of the curb and then some dirt beyond that.
Coppice
Coppice is the most important corner at Donington Park as it has the longest straight after it. The approach is uphill and the apex is blind. It’s very difficult to pick up this apex when you’re traveling at speed. On the left-hand side we have some good reference points for braking, mainly the curb. For me, this is the best reference for braking at Coppice.
As I mentioned with Redgate you may be braking 20 meters before this point or even after it, but just use this as a reference. The braking at Coppice is uphill which will aid the braking. Now you can see we’re heading towards Coppice, but we can’t see the apex. Finding the apex is not easy and comes with experience and seat time at Donington.
We’re keeping the car over to the left-hand side and braking in a straight line. At this point, we’ll be releasing the brakes as we come over the crest and as you can see here I’m turning in just as the apex comes into view. In terms of a turning point reference, use the end of the curb on the left as a reference, but don’t focus on the outside curb as you should be looking towards the inside of the corner.
It’s important that you make it to the apex of the corner at Coppice because you really need to get on the accelerator as soon as possible to accelerate yourself down the next straight.
The curb at Coppice is typical for Donington Park: nice and flat and you can run right over it. At this point, as you’re making the apex of Coppice, you should already be looking right around the corner towards the exit point, and beyond. Getting on the accelerator as early as possible here is critical to lap time.
In terms of racing line, we don’t need to run out to the first curb on the left-hand side. If you let the car run out too wide here, you won’t be able to bring it back and you’ll run out of road and have to lift off the accelerator, which will just destroy the speed down the following straight.
Goddard’s Chicane
It’s very difficult to find a braking point for Goddard’s as all reference points are quite a long way away. It’s difficult to see anything in your peripheral vision, therefore the first braking reference I recommend is on the right-hand side here – the beginning of the outside curb for the Grand Prix circuit chicane. As we come closer to the chicane, you can use the end of the building on the left as a braking reference. Again, this is isn’t exactly where you should brake, but rather a reference.
By the time you’re on the brakes, you should already be looking down at the first apex of Goddard’s.
We’re slowing the car down heavily on the brakes and then at this point we’re beginning just to turn the car in. Now there is no real reference on the left-hand side for a turning point and anyway you should be already be looking towards the inside of a corner rather than concentrating on the left-hand side.
It’s important that you use as much road as possible at the apex of Goddard’s but as we’re bringing the car into the corner you can see that there is a big sausage curb on the inside. You want to use as much of the blue and white curb as possible without running over the red sausage curb. The sausage curb is about twenty centimeters high and shaped like a… well, sausage. So if you run over it, it can damage your car and really won’t save you a lot of the time.
As we come through the first section of Goddard’s we don’t want to run too far to the left because it will ruin our exit through the second section. We also don’t want to keep the car to far to the right – if it is too far to the right it’s likely you could have taken more speed through the first part. So we’re looking for a quick compromise here.
As with the right-hand part of Goddard’s we don’t want to take too much curb on the left and run the risk of running over the red sausage curb.
Goddard’s is very important as it controls your speed down the start/finish straight and ideally you want to be on the accelerator as soon as possible. We bring the car into the apex, using the maximum amount of curb on the left-hand side before we get back on the gas and exit Goddard’s. As always, make sure your vision is looking way ahead of yourself; we should be already be looking well around this area here.
As you exit the corner there is quite a nasty bump so be careful as you’re coming out towards the curb. Once we’ve gone over the bump we let the car run as wide as we possibly can. Be careful that you don’t run over the curb and onto the grass. Here there is no concrete on the right-hand side of the curb and so if you fall off the curb you’re directly onto the dirt. If you spin here the inside pit wall isn’t too far away.
Thank you for watching the Driver 61 Circuit Guide to Donington Park. If you have any questions or comments please leave them below. Please be sure to check our other resources and guides.