The 6 Phases of a Corner
The 6 Phases of a Corner
We’re going to take a detailed look at the six phases of a corner – how to take a corner and what you should be doing at each point through it.
This whiteboard lesson will cover:
- the six phases of a corner
- how to best take a corner
- how to carry the most speed through the corner
- what inputs you should be making with the pedals
Now that we understand what a racing line is, it’s time to look at the six phases of a corner – basically, what we’re supposed to be doing at each point through a corner and how we should do it.
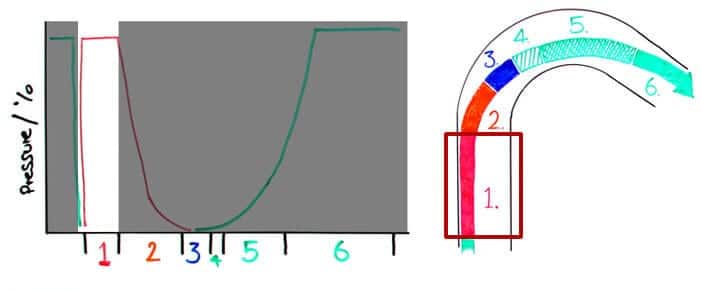
There are six phases to any corner, which you can see in the diagram below and are as follows:
- Braking and downshifting
- Trail braking
- Pedal transition
- Balanced throttle
- Increasing throttle
- Maximum throttle
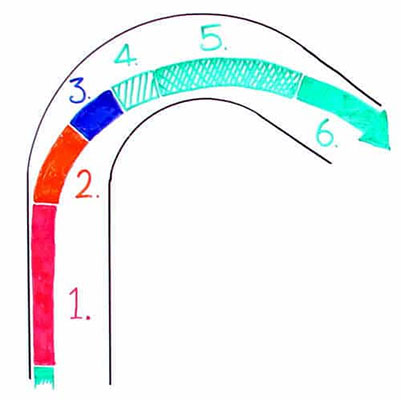
We’ll head into more detail about each section in a little while, but to be more clear let’s take a look at the graph below. This chart describes what we should be doing with the pedals at each point through the corner.
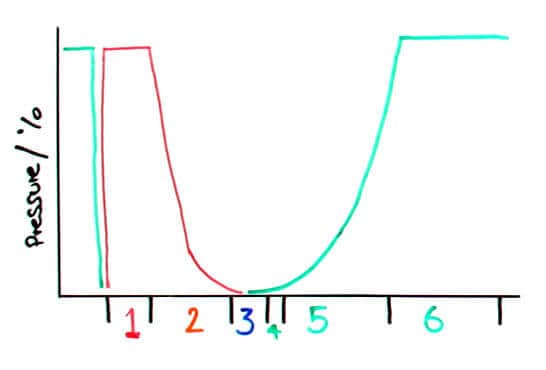
We can see pedal pressure or percentage against distance where the green line is throttle position %, and the red line is brake pressure %. As you can observe, we’ve split the distance axis into six sections which correspond to the corner diagram.
The first line you can see (to the left of section 1) is where the driver is at 100% throttle before the corner – he is flat out before he lifts for the braking phase.
Phase one of the graph shows braking pressure from 0% quickly up to 100%, where the pressure stays while the car is in a straight line and at maximum braking capacity (see corner diagram).
Phase two shows a smooth blend off the brakes as the car begins to enter the corner. Notice that this step takes some distance and the pressure is released slowly.
Phase three explains the area where neither the brake nor accelerator is being used. This is the transition time of your foot from one pedal to the other.
Phase four shows the balanced throttle stage, where the driver is re-engaging the engine to maintain speed – not accelerate. Just like the final part of the trail braking phase, notice how smooth the initial application of the throttle needs to be.
Phase five is where the driver begins to launch the car out of the corner, increasing the throttle position and decreasing steering angle – the further out of the corner the driver is, the quicker the increase in throttle position.
And finally Phase six – the point where you finally have the confidence to go flat out and get to 100% throttle!
Cornering Phase 1 – Braking and Downshifts
Almost all of the deceleration before the corner will take place in this first phase. The car should be in an entirely straight line – like this you can use 100% of the car’s grip for slowing down (as soon as the car turns even a little, you’re taking grip away from braking).
It sounds obvious to say that you should spend as little time braking as possible, but this is a common loss of lap time even for experienced drivers. We’ll have a more detailed tutorial on braking later in this series.
Spending as little time on the brakes as possible is critical for lap time, but what’s more important is to arrive at the turn-in point (around phase two) at the correct speed for the corner.
Arrive too fast and you’ll overshoot the corner and ruin your exit. Arrive too slowly and you’ll have lost time in this braking phase. There’s a sweet spot and, to consistently arrive at the correct speed, you’ll require good track vision – something we’re going to cover in the next tutorial.
Another thing to note in this phases is that if we’re decelerating a reasonable amount, we’re going to need to downshift. Gear changes should be evenly spaced through the braking zone and as always be as smooth as possible. For extra smoothness, you can learn how to heel and toe here.
Cornering Phase 2 – Trail Braking
Trail braking is a technique whereby you turn into the corner while you’re still on the brakes – at a much-reduced pressure. The technique is much more about controlling the pitch of the car rather than deceleration, where an experienced racer will shift the grip between the two axles.
Let me say this is not a technique for beginners, but if you want to learn more about how to trail brake, see our article here.
The reason we ask beginners not to trail brake is that it requires a lot of feel and balance to combine braking with turning. If you’re new to track driving it’s likely you won’t have the finesse (yet) to trail brake properly, and you’ll run the risk of spinning.
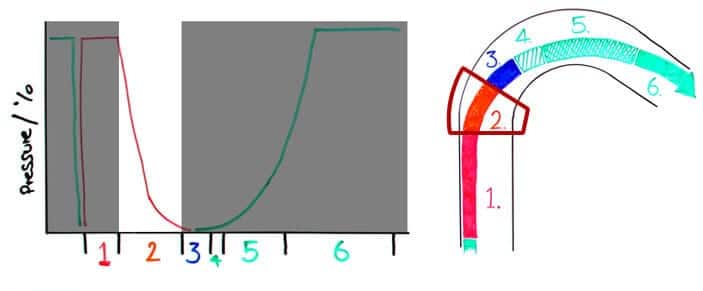
Whether trail braking or not, a smooth release of the brake pedal is critical to being a fast driver.
The final 10-20% of braking pressure should be released as smoothly as possible – as you can see by the shallow curve on the graph.
If you’re a beginner, make sure you release the brakes gently and when you’re in a straight line. As I mentioned, if you have the brakes on when you turn you run the real risk of spinning your car.
Cornering Phase 3 – Pedal Transition
The pedal transition phase is where you come completely off the brake pedal and move across to the accelerator pedal.

This phase is critical for smooth (and fast) circuit driving. If, when driving on track, you can physically feel the front of the car ‘pop’ up when you release the brakes, you’ve come off too harshly.
Likewise, if you can feel the car lurch forwards when you get back on the throttle, you’ve been too greedy. Put simply; you should not be able to feel the transition from braking to acceleration through the car.
You can practice this technique and build some muscle memory when driving your road car. As you release the brakes, do so as smoothly as possible and pay attention to the feeling at the front of the car. Furthermore, apply the throttle smoothly and be conscious of whether you can feel a ‘kick’ after engagement.
Cornering Phase 4 – Balanced Throttle
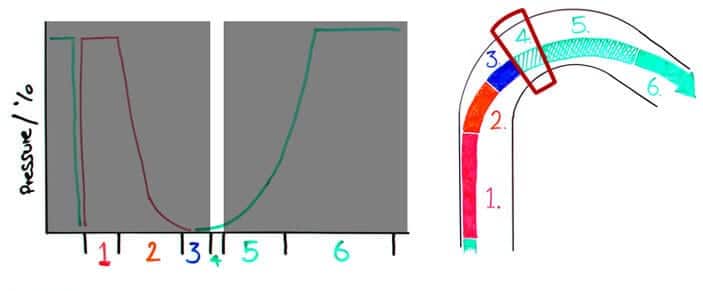
By phase four, we’re back on the accelerator a tiny amount and at this point, the car is turning as much as possible.
This phase isn’t where we begin accelerating, but rather where we re-engage the engine and maintain the speed at the apex. You’ll only be using a small amount of throttle – around 10-20% before you begin opening up the steering wheel and accelerating out of the corner.
Cornering Phase 5 – Increasing Throttle
At phase five on the diagram, the car is still turning a lot, but you’re able to see the exit point, and you can begin to gently open up the steering lock.
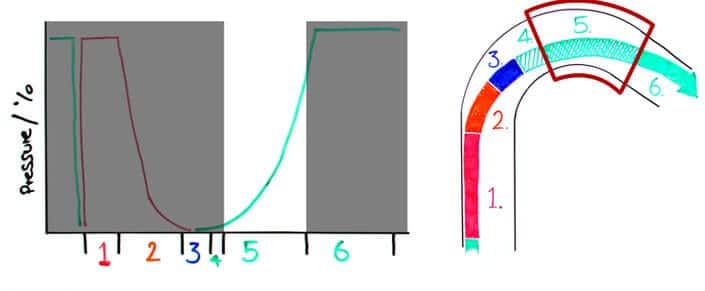
This is the phase where we’ll go from 10-20% throttle to almost flat out, but your inputs must still be completed with smoothness and correlation to steering angle.
As you begin to open up the steering and exit the corner you can begin to increase the throttle position – the more you open the steering wheel, the more you can press the throttle pedal.
Imagine the maximum steering angle of the corner in question. Now, imagine a thin piece of wire from the top of the steering wheel down to the top of the throttle pedal. The wire currently taught and restricting the throttle pedal, but as you release the steering, you can press the throttle down further. This is how you should think about the correlation between the steering and increasing throttle.
Cornering Phase 6 – Maximum Throttle (finally!)

This phase should progress quite naturally from phase five, but the idea it to get to maximum throttle as soon as you can. That way you’ll propel yourself down the next straight as quickly as possible and reduce your lap time.
The point at which you can get to maximum throttle depends on a few things, including the power/grip ratio of your car. If you have more power and less grip, you’re going to have to wait a little longer before you’re flat out, compared to a low power and high grip car.
So, that’s it for this first tutorial. Thank you very much for reading and please sign up to be informed when the next whiteboard tutorial is released. If you have any questions or comments, please get in touch and I’ll get back to you.


