Trail braking is an advanced driving technique that we’re examining in today’s whiteboard tutorial.
The brakes of a track car are so much more than just a deceleration device – they allow a driver to manipulate and alter the pitch of the car as they enter a corner and this is trail braking.
In the trail braking tutorial I’ll cover:
- What is trail braking
- How to trail brake
- Why trail braking is faster
- When to trail the brakes
- Using trail braking to cure balance issues
Mario Andretti once said he was amazed by how “drivers still think the brakes are for slowing the car down”. And he’s right.
As I mentioned, the brakes have much more use for us on track than just slowing a car down. They allow us to control the pitch and weight of the car – front to rear – as we enter a corner.
Change the pitch of the car and you alter the balance of grip from front to rear and visa versa. If you have the ability to modify the balance of the car, then you set yourself up to get the most grip out of each end of your vehicle at all times when entering a corner.
What is Trail Braking?
Trail braking is a term used to describe the technique of lightened, yet continued braking while turning into a corner.
It is a term commonly used around the paddock, but one I rarely see being carried out properly or completely utilised on track. So, I’ll start with the basics.
To trail brake is to blend braking and turning at the same time. It enables a driver to brake slightly later, but more importantly, manipulate the car’s mass to aid corner entry.
This technique is not the ‘racing school’ method of braking in a straight line, releasing the brakes and then turning into the corner. Nor is it necessarily braking all the way to the apex – although that is a possibility.
How to Trail Brake
Trail braking is a difficult technique to get consistently right. It requires a lot of feel to ensure you’re getting the most out of all four tyres at corner entry, but when you get it right, you’ll be fast.
Here’s how to trail brake:
- Brake in a straight line at maximum force
- Slightly before the turn in point begin to ease off the brakes
- Begin to turn into the corner
- As you increase steering angle, reduce braking pressure
- Use appropriate amount of braking to keep a well-balanced car through the corner entry phase

If you trail brake, you’ll be able to brake a few metres later than normal, but as usual, ensure the majority of your deceleration is done in a straight line. As I spoke about in our grip tutorial, you can only complete the maximum braking while you are not turning.
As you’re approaching the turn-in point begin to ease off the brakes. It’s important that this part of the process is smooth – begin to come off the brakes too quickly and you’ll unbalance the car.
At the turn-in point, start to turn your car toward the apex. It’s important here to have good vision and you should already be looking at the apex. This is the point where trail braking begins, as you’re trailing the brakes past the turning area.
As you increase steering angle, to bring the car into the apex, you’ll need to continually release brake pressure.
The more steering input, the less braking force you’ll be able to keep until you reach the final 10-15% of brake pressure, where you’ll only be using the brakes to control the pitch of the car.
This is the tricky part, where the car may rotate (oversteer) and a delicate touch is required.
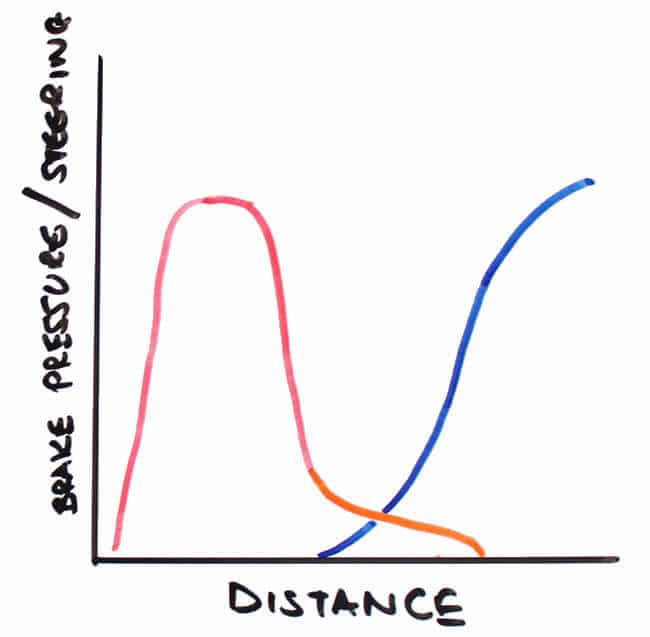
The diagram below shows an example data trace braking (red) and steering (blue) from a driver who is trail braking.
As you can see the driver brakes (up to the grip threshold) in a straight line and without any steering, to decelerate as quickly as possible.
Then, once he has released brake pressure somewhat, he begins to turn into the corner. As the car enters the corner, the amount of trail braking required depends on the balance of the car.
Ideally, we want to be using all of the available grip from the four tyres which we control by braking slightly more or less and altering the car’s pitch.
You can watch our tutorial on weight transfer for more information on this, but basically, more braking equals more front/less rear grip and less braking equals less front/more rear grip.
Just before the apex the driver should be completely off the brakes and the tyre’s grip will be wholly used for cornering, with no grip used for deceleration.
Why does trail braking make me faster?
As I’ve already mentioned, we trail brake so that we’re using all of the grip available – from the front and rear tyres – through the corner entry phase.
We can understand this more easily if we take a look at the G-circle diagrams below, showing the grip usage of a professional and amateur driver through a corner.
The G-circle shows the potential grip available for braking, turning and acceleration with the outer ring displaying the maximum grip potential in any given direction.
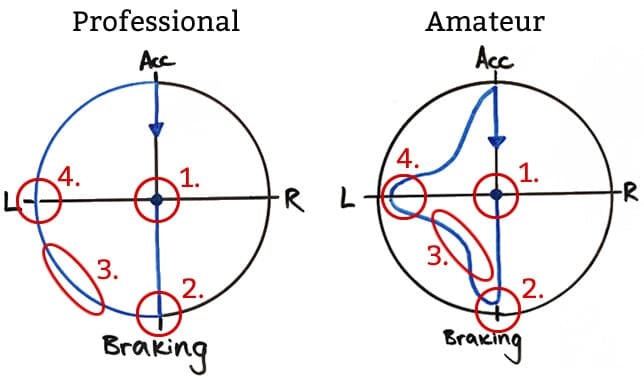
As you can see, the blue line shows each driver’s usage of available grip. The professional driver is using 100% of the grip available all the way through the corner, but the amateur isn’t quite there. Here’s what’s going on for both drivers:
Professional Driver
- Car arriving at corner at near constant speed.
- Brakes as late as possible, using 100% of grip available. The driver is on the threshold of locking a tyre.
- As the pro turns into the corner, he balances the reduction in braking force and increase in steering perfectly, using all of the grip available.
- Deceleration is complete and now the car is using 100% of available grip to turn.
Amateur Driver
- Car arriving at corner at near constant speed
- Not quite using all of the grip available to brake and therefore braking too early. The driver may be concerned about locking a tyre.
- The amateur driver releases the brakes more when in a straight line and then begins to turn into the corner. As you can see there is more grip available to both decelerate and turn.
- Deceleration is complete and the car is turning with its peak g-force however, the driver is not using all the grip available and could carry a little more corner speed.
Not utilising all of the available grip will mean the amateur won’t be able to carry as much speed into the apex, therefore losing lap time.
In the graph below you can see the two drivers’ speed traces, showing the differences between the pro (red) and the amateur (blue).
As you can see the red line carries much more speed to the apex, whereas the blue line does not manipulate balance advantageously. It’s most likely that the car represented by the blue line is oversteering on entry to the corner – due to too much trail braking.
The driver is keeping the brakes on for too long, giving the front too much grip and so the rear will slide as it’s the limiting factor.
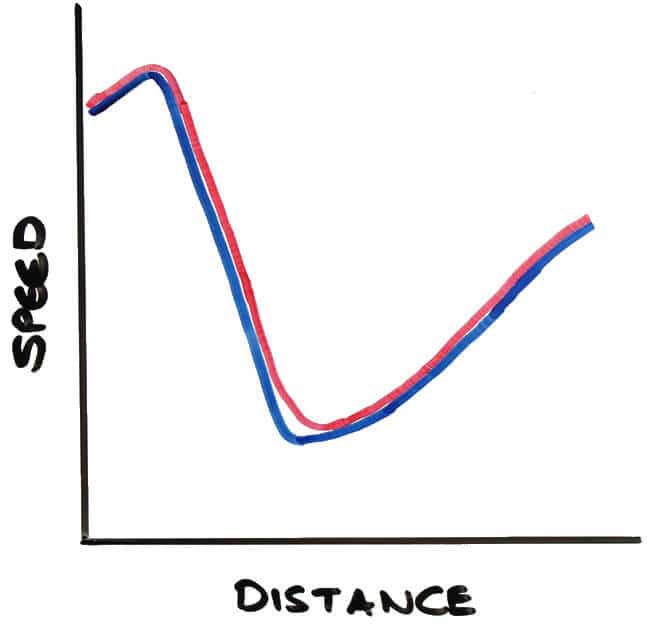
This is a common data trace seen when coaching track day and race drivers, highlighting poor weight-balance management: the car is on its nose, the front has a lot of grip, but the rear has very little.
The solution? Release the brakes earlier, let the nose rise and distribute the car’s weight more evenly – allowing the rear to grip and creating an even balance.
When to trail the brakes
It should be said that it’s not necessary to trail brake into all corners. Trail braking is best suited to slower corners where we want to ‘rotate’ the car before the apex to turn the car more and open up the exit, allowing us to get on the throttle earlier.
In faster corners we won’t trail brake as much and we’ll likely come off the brakes earlier (although probably still trail a little) so that we don’t transfer too much grip to the front tyres and can keep the rear settled, which is what you want in the quick stuff.
The amount of trail braking needed for a specific corner isn’t set in stone. You’ll need to be dynamic in your approach as the difference in corners, setup, track temperature and so on, will affect the balance of your car and the amount of trail braking required.
For this reason, trail braking is about feel and reacting to how the car moves underneath you once you’ve turned in.
Using trail braking to cured balance issues
Even if you’ve been testing before a race weekend, there may still be instances where the car’s setup isn’t perfect once you hit the track and we often hear F1 drivers complain about a lack of balance after a race.
This is where one end of the car generally has more grip than the other and the driver will complain about too much understeer or too much oversteer.
Trail braking can help cure this somewhat as we can control the weight of the car, and therefore grip, if we can change our driving technique slightly.
Imagine you have a car that has too much understeer, where as soon as you turn the car into the corner, the front pushes wide and likely won’t make the apex.
With this scenario, there is a ‘front limited’ balance as the front doesn’t have enough grip. When this happens, a good driver will understand that we need to give the front of the car more grip on entry.
How do we do this? Well, we need to keep more weight over the front tyres when we turn the car in and we do this by releasing the pressure on the brake pedal slightly later.
This means the front of the car is diving more (see weight transfer tutorial for more information) and has more weight and therefore grip, hence helping the balance issue.
In summary
Trail braking is an advanced technique that’s hard to master – however, once a driver has the feel and experience to get it right, they’ll be faster over a lap and be able to ‘drive around’ smaller setup issues.
Perfecting the technique takes a decent amount of seat time, but a good driver coach will help reduce the learning curve and can assist you with other technical aspects of your driving.
As always thank you very much for reading and if you have any questions, please get in touch. See you next time, Scott.