The exit phase is important because it controls how much speed we carry onto the following straight.
As we know, this is crucial because any extra momentum we take onto the straight accumulates to a significant reduction in lap time.
Welcome to tutorial #15 of our Driver’s University series. Today we’re examining how to make the most out of the exit phase of a corner.
This tutorial will include:
- What is the exit phase of a corner?
- How to get the most out of the tyre
- Using all available grip
- Using all available track
- European, UK and USA track limit rules
- How to improve through the exit phase
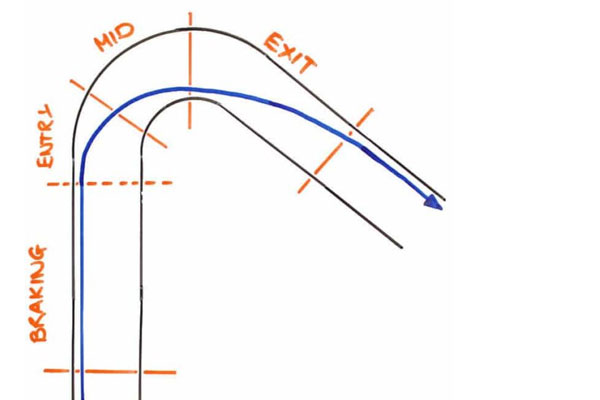
What is the exit phase of a corner?
The exit phase of the turn is the section following the peak in lateral G-force and where the driver has re-engaged, albeit very slightly, the accelerator. It’s where the driver begins to open up steering angle and pushes the car from a constant speed to acceleration and then to 100% throttle position.
The focus of the exit phase is to set the car up for the next corner (if it’s close) or to maximise the speed onto the following straight.
Getting the most out of the tyres
We’ve already spoken about getting the most out the tyres in a previous tutorial, so I won’t cover it too much here.
Tyres only have a finite amount of grip which can be used for braking, cornering, acceleration or a blend of two. What’s important to understand is that when you use grip in two directions (braking and turning or turning and accelerating), the grip has to be taken from one to give to the other.
Regarding corner exit, we have to transfer grip – as smoothly as we can – from being used entirely to turn, to being used solely to accelerate.
The change in usage of grip in this phase is not a switch, rather a gentle transition from cornering to acceleration.
The G-circle diagram below explains this clearly. The outer ring shows the maximum grip or G-force a car has in any direction – braking, cornering or acceleration.
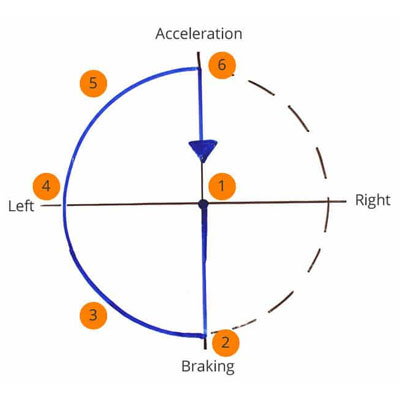
- Starting from the centre of the circle, the car is arriving at a corner (for the sake of simplicity, at a constant speed) with no G-force.
- Then, the driver hits the brakes and uses 100% of available grip for braking, while in a straight line.
- Now some of the braking grip has been transferred to cornering – this is where the driver is trail braking into the corner
- Just before the apex the driver transitions very gently from the brake pedal to the throttle and maximum cornering G-force is pulled, as described in the last tutorial
- The driver opens up the steering angle and continues to increase throttle position up to 100% – transitioning from cornering grip to acceleration grip
- The car is in a straight line and all grip is used for acceleration
To give ourselves the best opportunity to maximise the exit phase, using all available grip and circuit width we must consider the following fundamentals:
- Good vision is critical – when you’re at the apex, you need to be looking towards the exit point. If you aren’t looking where you want to be in a few seconds, how can you position the car accurately?
- Begin to open up the steering angle – as just described with the G-circle, we must open the radius of the corner up, to allows us to transfer some grip from cornering to begin acceleration.
- Add more and more throttle – now that we’ve given the car some grip to start accelerating, we must use it! Continue to add more throttle as you open up the steering angle and transition grip away from turning to acceleration.
- Use all available grip and track – if the car isn’t about to break traction (or already sliding a little) and you don’t use every inch of the circuit, you’ll be losing time.
Using all available grip
It’s very easy to say that we need to use all of the car’s available grip through the exit phase, but in practice, it’s much more challenging.
Being below the ultimate grip threshold – where the car isn’t turning and accelerating as much as possible – is a common area for improvement with many track drivers.
Pushing the car to where it is just about to, or actually sliding, requires a good amount of experience and feel.
The best route to maximising your grip usage in the exit phase is to build up gradually, increasing your throttle input each lap until you feel the car begin to break traction.
This doesn’t mean stamping on the accelerator pedal once you feel confident you’ll make it out of the corner. As we know, anysharp inputs will cause a premature loss of traction and will reduce the speed we can take out of the corner.
Rather, we should gently increase the throttle position until we feel the car slide, and when it does, it’ll be progressive and more importantly, predictable.
I covered how to safely reach the edge of traction in a previous tutorial, so take a look if you require a refresh.
There’s also a difference between how a car might react in the exit phase depending on if it’s FWD or RWD.
FWD drive cars will always tend to understeer through the exit phase of a corner. This is because, in a FWD car, we’re asking the front tyres to do the majority of the turning and all of the acceleration out of the corner. It’s simply asking too much from them, so the front tyres break traction and understeer.
With RWD cars what happens through the exit depends on driving technique and car setup. As I spoke about in the weight transfer tutorial, the rear of the car squats under acceleration, shifting grip from front the of the car to the back.
However, as you begin to accelerate, an extra force is added through the rear tyres, also making them likely to break traction. Therefore, whether the front or rear breaks tractionfirst depends on a number of inputs.
Using all of the available road
It sounds simple to say that we need to open up our racing line as much as possible from apex to exit – reducing the corner’s radius – and allowing us to carry more speed.
However, so many track driver I see fail to use all of the track through the exit phase. They restrict their racing line, decrease the corner’s radius and so make carrying the maximum speed out of the corner impossible.
I’ve coached drivers who have the car rotating correctly from apex to exit – nailing the most difficult part of driving – but losing time to me just because they’re using 2m less of road width!
To be fast, you need to use every inch of the circuit, kerbs and sometimes grass.
The fundamental issue when drivers aren’t using all of the circuit is very simple; their vision isn’t far enough ahead, nor broad enough.
It’s like they’re wearing blinkers. If this is the case with your driving, when you’re next on track try to consciously tell yourself to look further ahead, with a broad field of vision.
And remember, the circuit is not just between the white lines – it can include the kerbs, and sometimes astroturf/grass, depending on the organiser or country you’re in.
European, UK and USA track limit rules
So, how do we know how much circuit we can use? Well, it actually differs from country to country and sometimes between series too. Here I’ll take a look at the general track limit rules for the UK, Europe and USA.
UK TRACK LIMIT RULES
The UK track limit rules changed a few years ago. Now that many kerbs in the UK are standard – flat, no character and unchallenging – and with astroturf and asphalt run-off areas through many corners, it became easy to take advantage by running wide.
The track limit rules in the UK are simple:
- All four tyres must stay within the circuit at all times
- The circuit is defined by the white lines
- Apart from where there is kerb, then you can run up to the edge of the kerb and not beyond
When enforced properly, I think the new rules in the UK are a good thing – particularly at the circuits with sensors to catch repeat offenders. This alters a driver’s mentality and makes us build up to corners, rather than just running off the circuit – like how we used to drive, when there was real grass and walls to hit.
EUROPEAN TRACK LIMIT RULES
The track limit rules on the continent (and for European series racing in the UK) are slightly different. It’s possible to run a little wider and take more advantage of the astroturf and run-off areas.
The European track limit rules are:
- Two tyres must stay within the circuit at all times
- The circuit is defined by the white lines
- It’s no different if there’s a kerb there or not
USA TRACK LIMIT RULES
The reason many European circuits need to have these controls is because of the gentle kerbs, astroturfed exits and huge run-off areas.
Many of the US circuits don’t have these mild kerbs, rather, more aggressive kerbs followed by grass or a wall. I hope it stays like this in the US, as it’s a real challenge for drivers. Consequently, drivers don’t want to run off the kerbs, as it will unsettle the car and increase lap time.
Nevertheless, there are a few circuits – such as COTA – where the kerbs are European spec, and so some rules need to be put in place as drivers will always take advantage.
It seems there are not standard practices around US circuits and organisers, so the rules – and your driving – will differ depending on the specific rules of your race weekend.

How to improve the exit phase
When you’re trying to put all of this information into practice on track, I suggest focusing on the following aspects:
- Vision – As always, ensure your vision is a long way ahead of where you currently are and is broad
- Smoothness – to build up to the edge of grip through the exit phase, make sure your throttle application and opening of steering angle is as smooth as possible
- Use all available grip – during and after your track session, think about whether you are using all of the grip available through the exit phase. If not, try and carry more speed out of the corner next time.
- Use all of the track – when you’re on circuit, make sure that you know how much road you can use and that you use it all. Any reduction in corner radius will affect your lap time.
So that’s all for today’s tutorial, thank you very much for reading. If you have any comments, please get in and if you enjoyed this article, please share. I’ll see you next week, Scott.