Getting Started with iRacing FOV
The FOV (Field of View) settings are often under-utilised in sim racing, usually because the settings themselves can be a little difficult to understand. In this article, you will get a better understanding of FOV and how to set your sim correctly in iRacing (bare in mind that other sim platforms use similar methods). When training students, particularly students that have hit what they think is their maximum potential, FOV is one of the first items we review and resolve. It’s amazing how easy it is to get wrong and the impact of getting it right.
If you want to skip past the theory and straight to how to set your FOV for iRacing, scroll down to the How to Set Your FOV in iRacing Section.
What is FOV
By definition, the Field of View is the extent of the observable world that is seen at any given moment. Put simply, it is the line of sight from your eyes. The viewable area in front of your face.
Human Maximum Vertical and Horizontal FOV
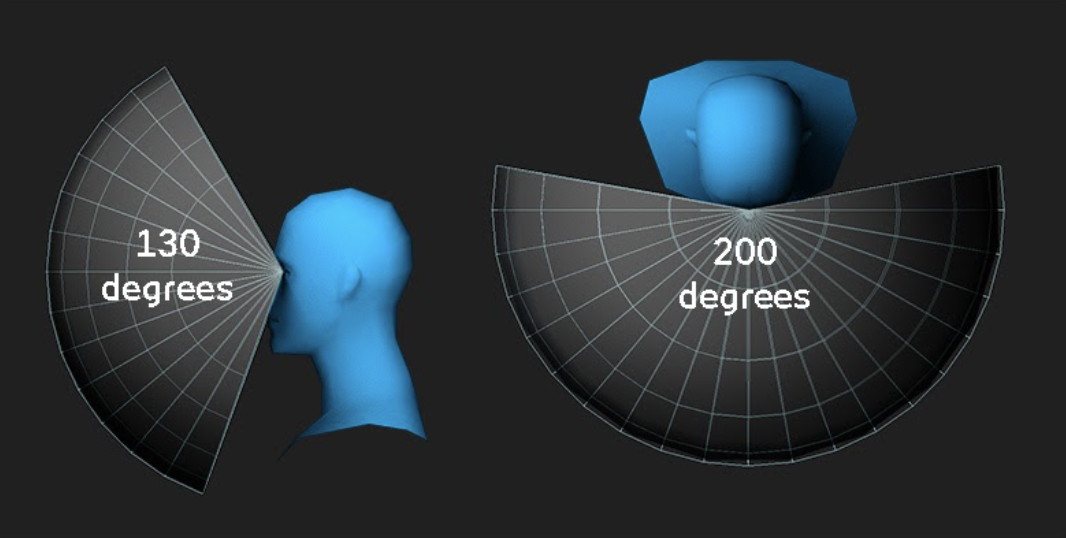
The unit of FOV is degrees and is the angle of viewable space in front of you (See diagram). FOV can be measured in two ways, vertically and horizontally. The diagram shows the maximum amount of viewable angle a person can see in both the horizontal and vertical. Notice that the human eye can see more horizontally, which is why TV’s and monitors tend to be rectangular. For iRacing, FOV is measured in degrees of view Horizontally.
In sim racing, the TV screen/monitor should be an extension of your vision and should look 100% real no matter what game you are playing. The best way to imagine your FOV should be to sit in your normal sim racing position but to imagine that you are sat in an actual car. The monitor/s in front of you act like a window, you can only see out of the car via that window, anything you see in that window is your FOV. If you move your body closer to that window, you can see more out of it, if you move further away from the window, you see less out of it.
How Does FOV Impact Your Driving?
FOV has a large effect on your sense of speed and distance. It will put objects in your peripheral vision into a better context and impact the “pixel size” of objects. With correct FOV you will now feel like items are passing by at the right speed, and your general spacial awareness will become clearer. A great description of this is to imagine you are driving down an empty highway, in the middle lane, doing 70mph. Items in the distance pass you slowly. Now imagine doing 70mph down a busy city centre, with buildings and traffic. All of a sudden that 70mph feels a lot faster. It’s the exact same concept with your field of view settings. Adjusting the line of sight to make objects near or far, seem as if they are travelling at the correct speed.
In essence:
- If your FOV angle is set too large then you are expanding your physical view past natural and items in the distance will feel faster
- If your FOV angle is set too small then you are narrowing your physical view and items in the distance will pass slower.
Below is an image of a screen with decreasing FOVs starting from the outer square (the widest FOV angle) into the inner square (the smallest FOV angle). If you imagine the portion of each box being stretched onto your monitor (or monitors) it will become clear that the smaller the FOV the larger the objects will be on your screen. For instance, in the widest FOV (largest box), the car in front will share the screen real estate with the mirror, passenger dashboard, etc. In the smallest FOV (innermost box) the car will now be on your screen but the side mirror, passenger dashboard, etc will not. Therefore, the car in front will be larger on your screen. This is the same for trees in the distance, the road, etc. This is why FOV impacts your sense of speed since the relative size of objectives on your monitor changes as FOV changes.
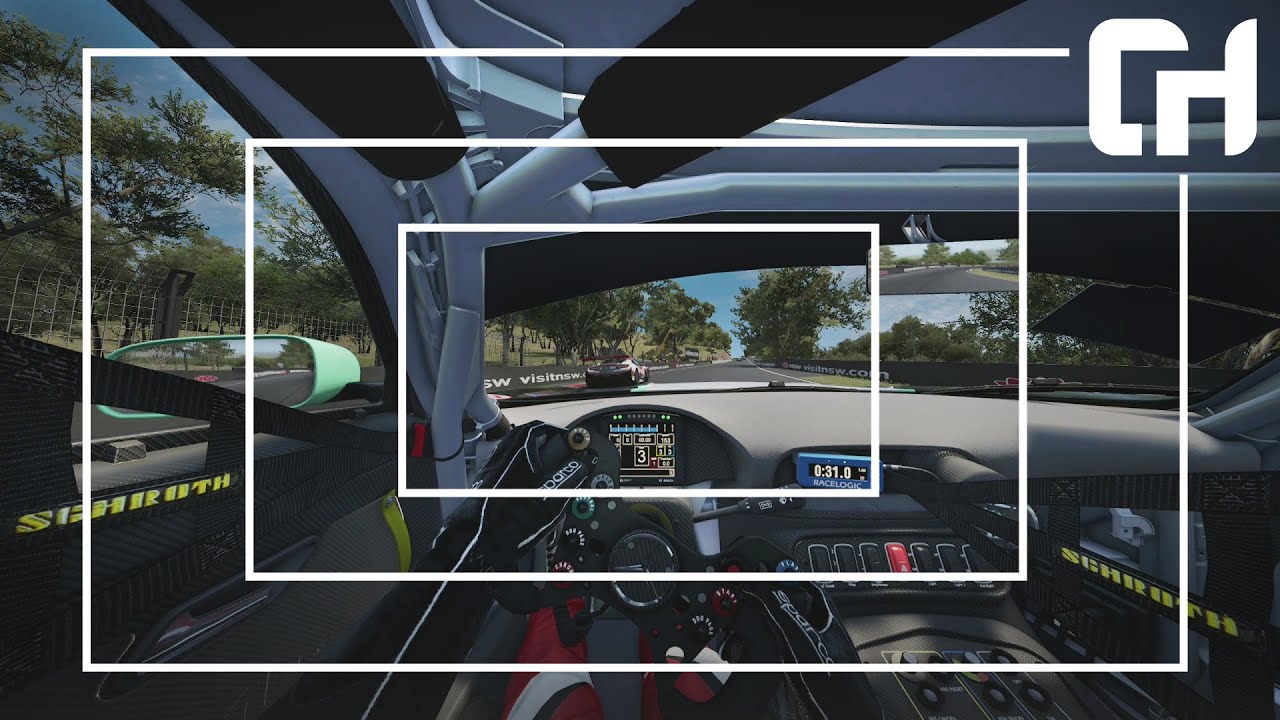
Photo Credit – Chris Haye
As a more illustrative example. If you start to cover the sides of looping video below from the outside to inside, you’ll see how, while you are proceeding at the same speed, your perception of the speed you are travelling changes drastically.
Getting Prepared to Setup FOV
Before diving into how to calculate FOV, there are a couple of points and measurements to consider. Firstly, it is important to have your eye level height in line with the middle of the screen vertically. This is so that you are maximising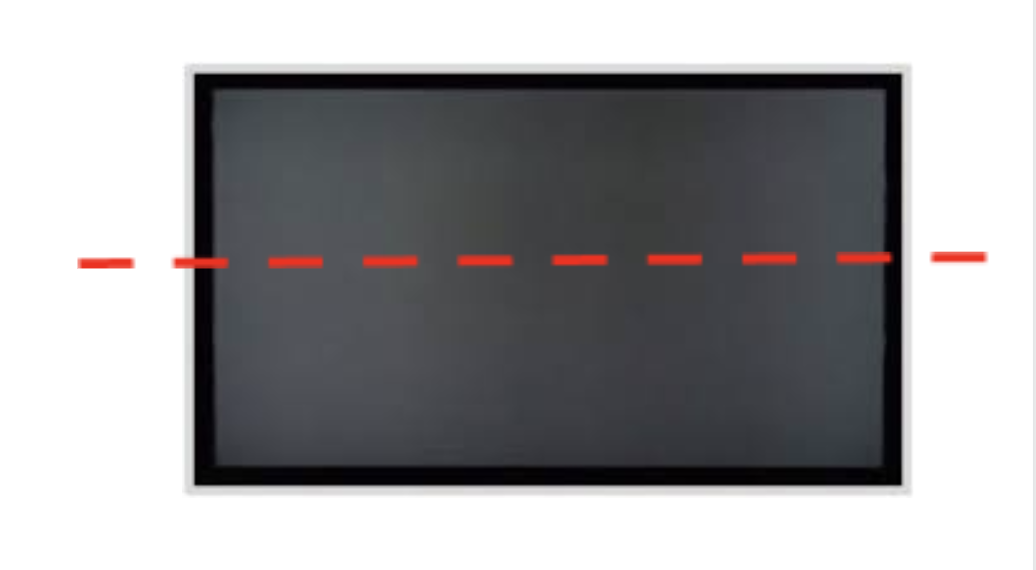 your peripheral vision as your eyes can see the exact same amount above the centre line as they can below the centre line. See diagram. It is however not always achievable, due to your real-world seat position or your own body height. This is ok and can be adjusted in-game to compromise. More info in the FOV setup below.
When trying to understand FOV in relation to sim racing, there are a few variables that will affect what you see. You will need to know these to make your FOV adjustments:
- Setup Type – Whether you use or plan to use a single screen, triple screens, or VR
- Screen size (window size) – Width of the screen in mm or inches (not applicable for VR)
- Distance – from your eyes to the screen in mm or inches (not applicable for VR)
- Bezel – Monitor Bezel thickness (on one side of screen) in mm or inches (not applicable for VR)
How to Setup Single Monitors vs How to Setup Triple Screen vs How to Setup VR
There are obviously some visual differences between running a Single Monitor, Triple Screens and VR. When referring to the FOV, the distance that your eyes are from the screen plays a major role in how much you can see out of the ‘virtual window’. With a single screen, therefore, having the smallest available viewing area and a VR headset having almost the maximum amount of viewable area. This is because a VR screen is so close to your eyes. A triple setup is also going to be considerably better than a single screen because you will get a ‘wrap-around’ view and improved peripheral vision. A triple setup is also increasing the viewable window and therefore giving you a better FOV.
iRacing has built-in settings for VR headsets so that there is no need for you to do any FOV calculations. However, single and triple screen setups will require adjustment from the default.
How to Setup FOV on Curved Monitors
Curved monitors continue to gain momentum with Sim Racers as they allow users to have even wider screens. Luckily, setting up the FOV on curved monitors is just as easy as setting it up for a single screen. This is because, ultimately, while the screen is curved, the curve is not substantial and, therefore, you can use the single scree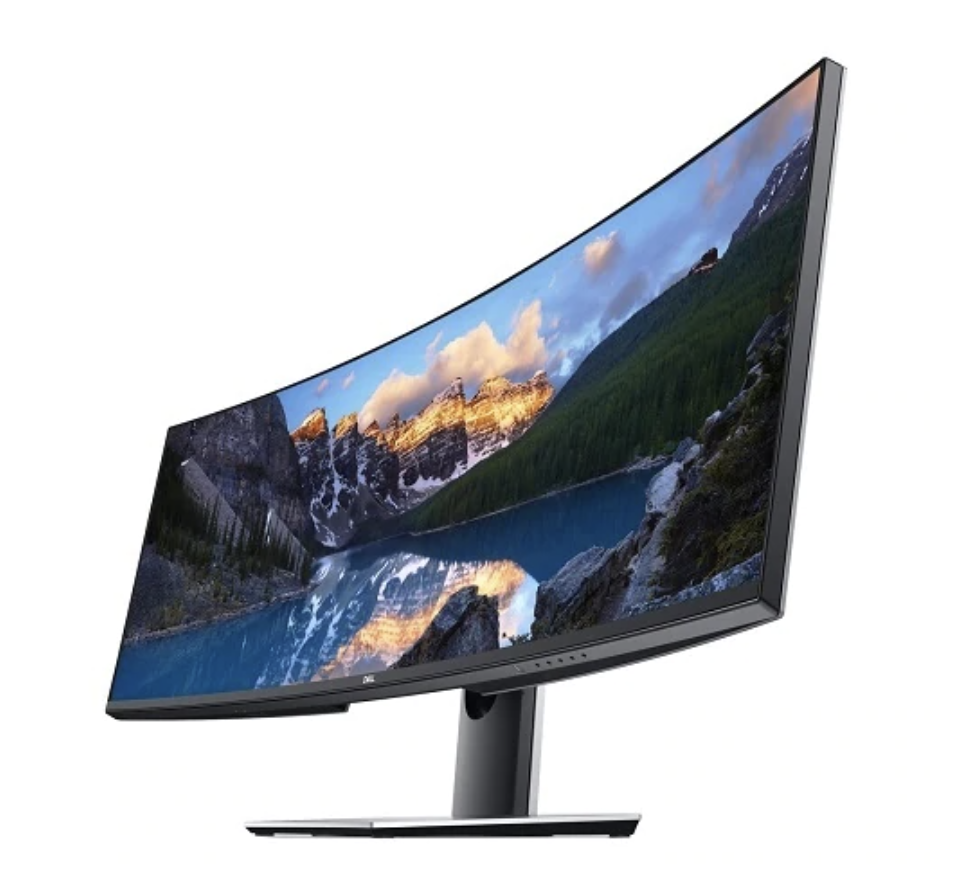 n settings for a curved screen. In addition, since drivers often move slightly backwards and forwards while driving, that further diminishes the impact of the curving. The only potential change we recommend is to ensure you measure the width of the screen with a tape measurer since its flexible and can collect accurate data for your monitor.
How to Set your FOV in iRacing
Near the end of this article, we have provided the calculations necessary to manually calculate FOV. However, luckily there are some great calculators on the internet to help you with setting your FOV. One that we really like at Driver61 is the https://sampsoid.com/fov-calc/. His calculator is very self-explanatory and goes through each step clearly.
To use this calculator, you will need to know your:
- Monitor Setup – 1 or 3 screens
- Monitor Width – including bezels (for a triple screen, it is the entire width of all 3 screens if they were positioned flat)
- Distance from Eye to Screen
- Monitor Bezel width (just one side)
Add your measurements to the calculator and you should be given a list of settings. Once you have these settings to hand, go ahead and add those into the iRacing ‘Options’, ‘Graphics’ settings in-game (see image below). Making sure to enter them exactly as labelled in the Calculator. Also, bare in mind that the calculator will suggest the best angle between screens for a triple screen setup. You might need to physically adjust this. Note that you should not set the Monitor Width, Visible Width, or other settings (except Viewing Angle between screen for triples). These are used to auto calculate FOV in iRacing and will, ultimately, override what you enter.
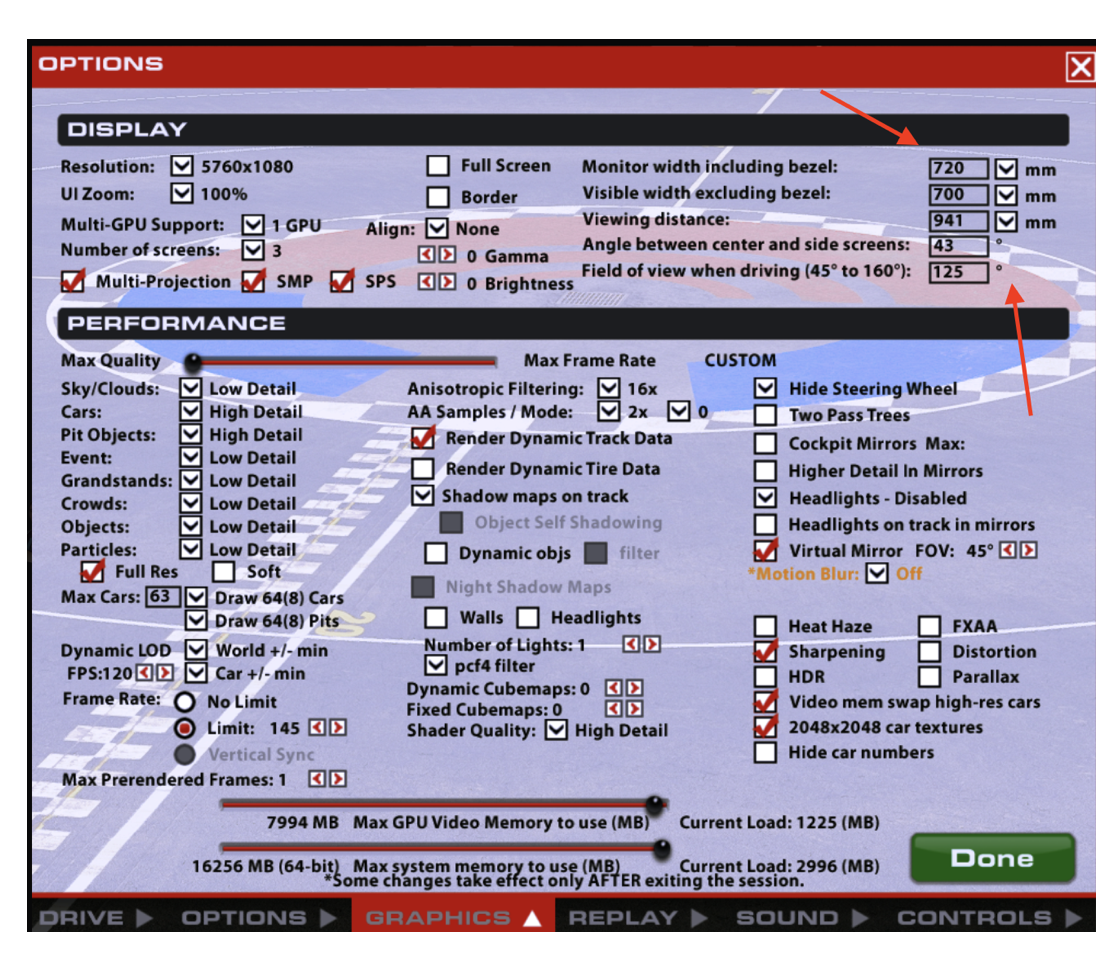
Set “Field of view when driving…” and “Angle between screens…” not the other settings.
Note that iRacing has a number of screens/places where Field of View can be set. This is important to understand because you can accidentally override one Field of View setting not knowing that you are changing the same setting from another screen. In the image below, the Field of View setting is the same as and linked to “Field of view when driving” in the image above.
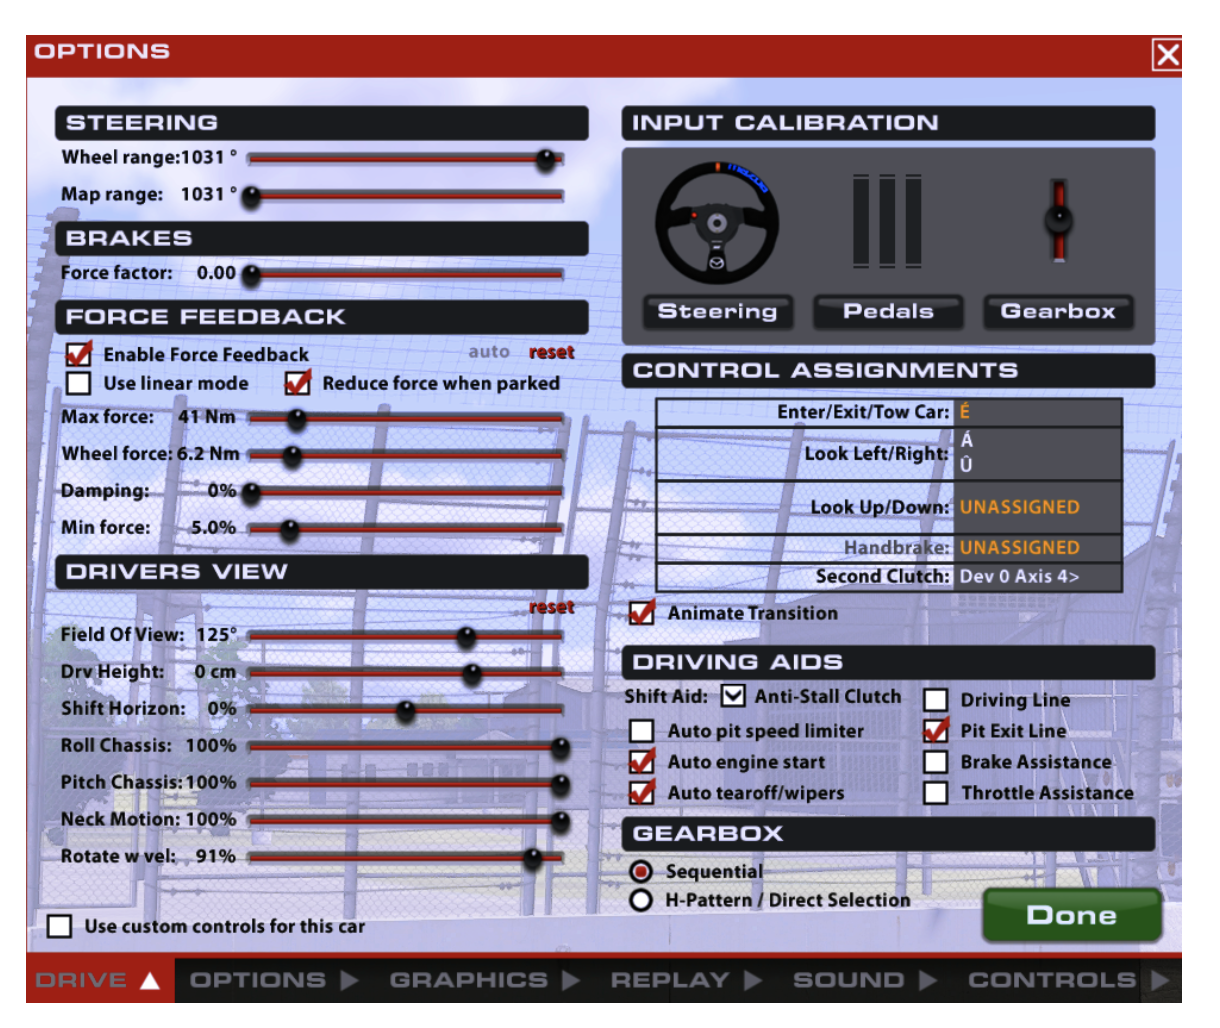
Another place to set Field of View. “Drivers View” field of view.
Once your graphics settings have been applied, you then need to jump out on track and see how it looks. For singular monitors, your results should be pretty good and shouldn’t need much adjustment. For Triple screens, however, you will more than likely see some type of ‘warping’ in your exterior monitors. When your eye level is not perfectly centred with the Horizontal middle line of your screens, then the horizon lines in the exterior screens will look curved or miss-shaped.
How to Fix Warping on Triple Screens
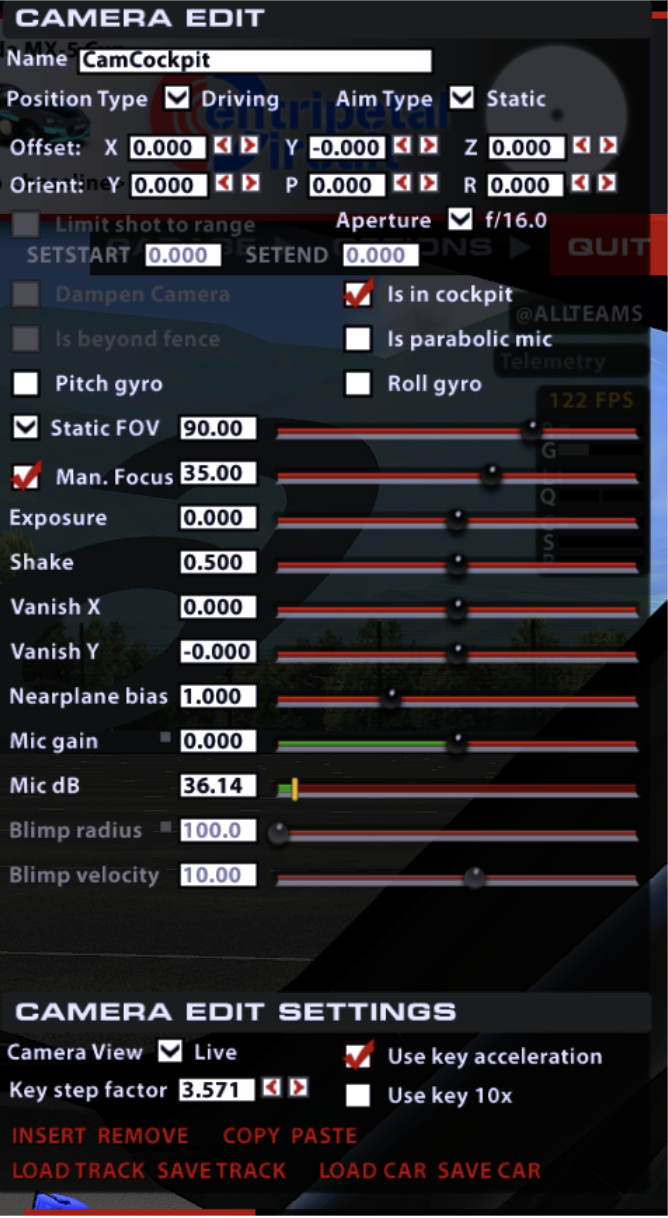
To fix ‘warping’ you can adjust your in-game Camera Edit tools by pressing ‘CTRL – F12’ in the replay screen. You can now adjust ‘Vanish Y’ until the Horizon lines become straight. Do not be concerned if now your Horizon line becomes very high or very low on the screen. Once you have the Horizon line looking straight and parallel, you now need to halve your result and use this as your Vanish Y.
More than likely your Horizon line will now be off centre and the view from the cockpit will be off and/or unusable. The next step is to adjust the ‘Orient P’ which is the drivers head rotation. To get the correct value here, multiply your ‘Vanish Y’ value by 0.3. This is to compensate for the viewing angle (reference Sampsolid calculator Video). You should now have a usable, straight view.
Example Warping Fix Calculation
- The horizon looks straight at ‘Vanish Y’ = -26
- Dive this by 2 (half) = -13 and set this as ‘Vanish Y’
- Set ‘Orient P’. -13 x 0.3 = -3.9
iRacing FOV Shortcuts
If you would like to make further adjustments in-game to your FOV and Vanish points, you can use the following default shortcut keys:
FOV Adjustment
- [ = increase FOV
- ] = decrease FOV
Vanish Y Adjustment
- SHIFT + [ = increase Vanish Y
- SHIFT + ] = decrease Vanish Y
The Math Behind FOV (how to calculate yourself)
For those of you interested in the Math behind the FOV calculations. There is a method supplied by ‘iRacing: FOV Explained’ for finding your own FOV settings. They’re not perfect, since the bezel size of your monitors are not applied correctly in the iRacing model, but the end result is a good starting point for tweaking.
The formula for FOV is:

- Tan-1 is a function of Tan which is used to calculate the angle in triangles. It should be a button on any scientific calculator
- W is the Width of your screen in mm or inches. For triple screens, it is the total width of all 3 of your monitors if they were lying flat
- D is the distance from your eyes to the screen in mm or inches
Whether to measure in mm or inches is completely up to you, but both of your measurements for W and D need to be the same unit; i.e both mm or both inches. Ultimately, your answer to this equation will be the FOV setting in Degrees.
Once you’ve added your FOV angle into the graphics settings in iRacing, you may need to follow the same ‘warping’ instructions as mentioned above.
Conclusion
So now the FOV is set correctly, time to take it out on track and test it. Instantly the game should feel better. Movement of the car should feel more natural, your braking distances and references should feel easier to gauge and you should have a better awareness of things around you. Your fastest lap times may not improve, but consistency and repeatability will come in leaps and bounds.
If you found this article helpful, then please let us know! If you’ve found that these settings still aren’t quite right, then let us know too! We are always looking for the best information and research moving forward.